Custom Lens Flare
아래 사이트의 글을 번역및 엔진 버전에 맞게 수정되었음.
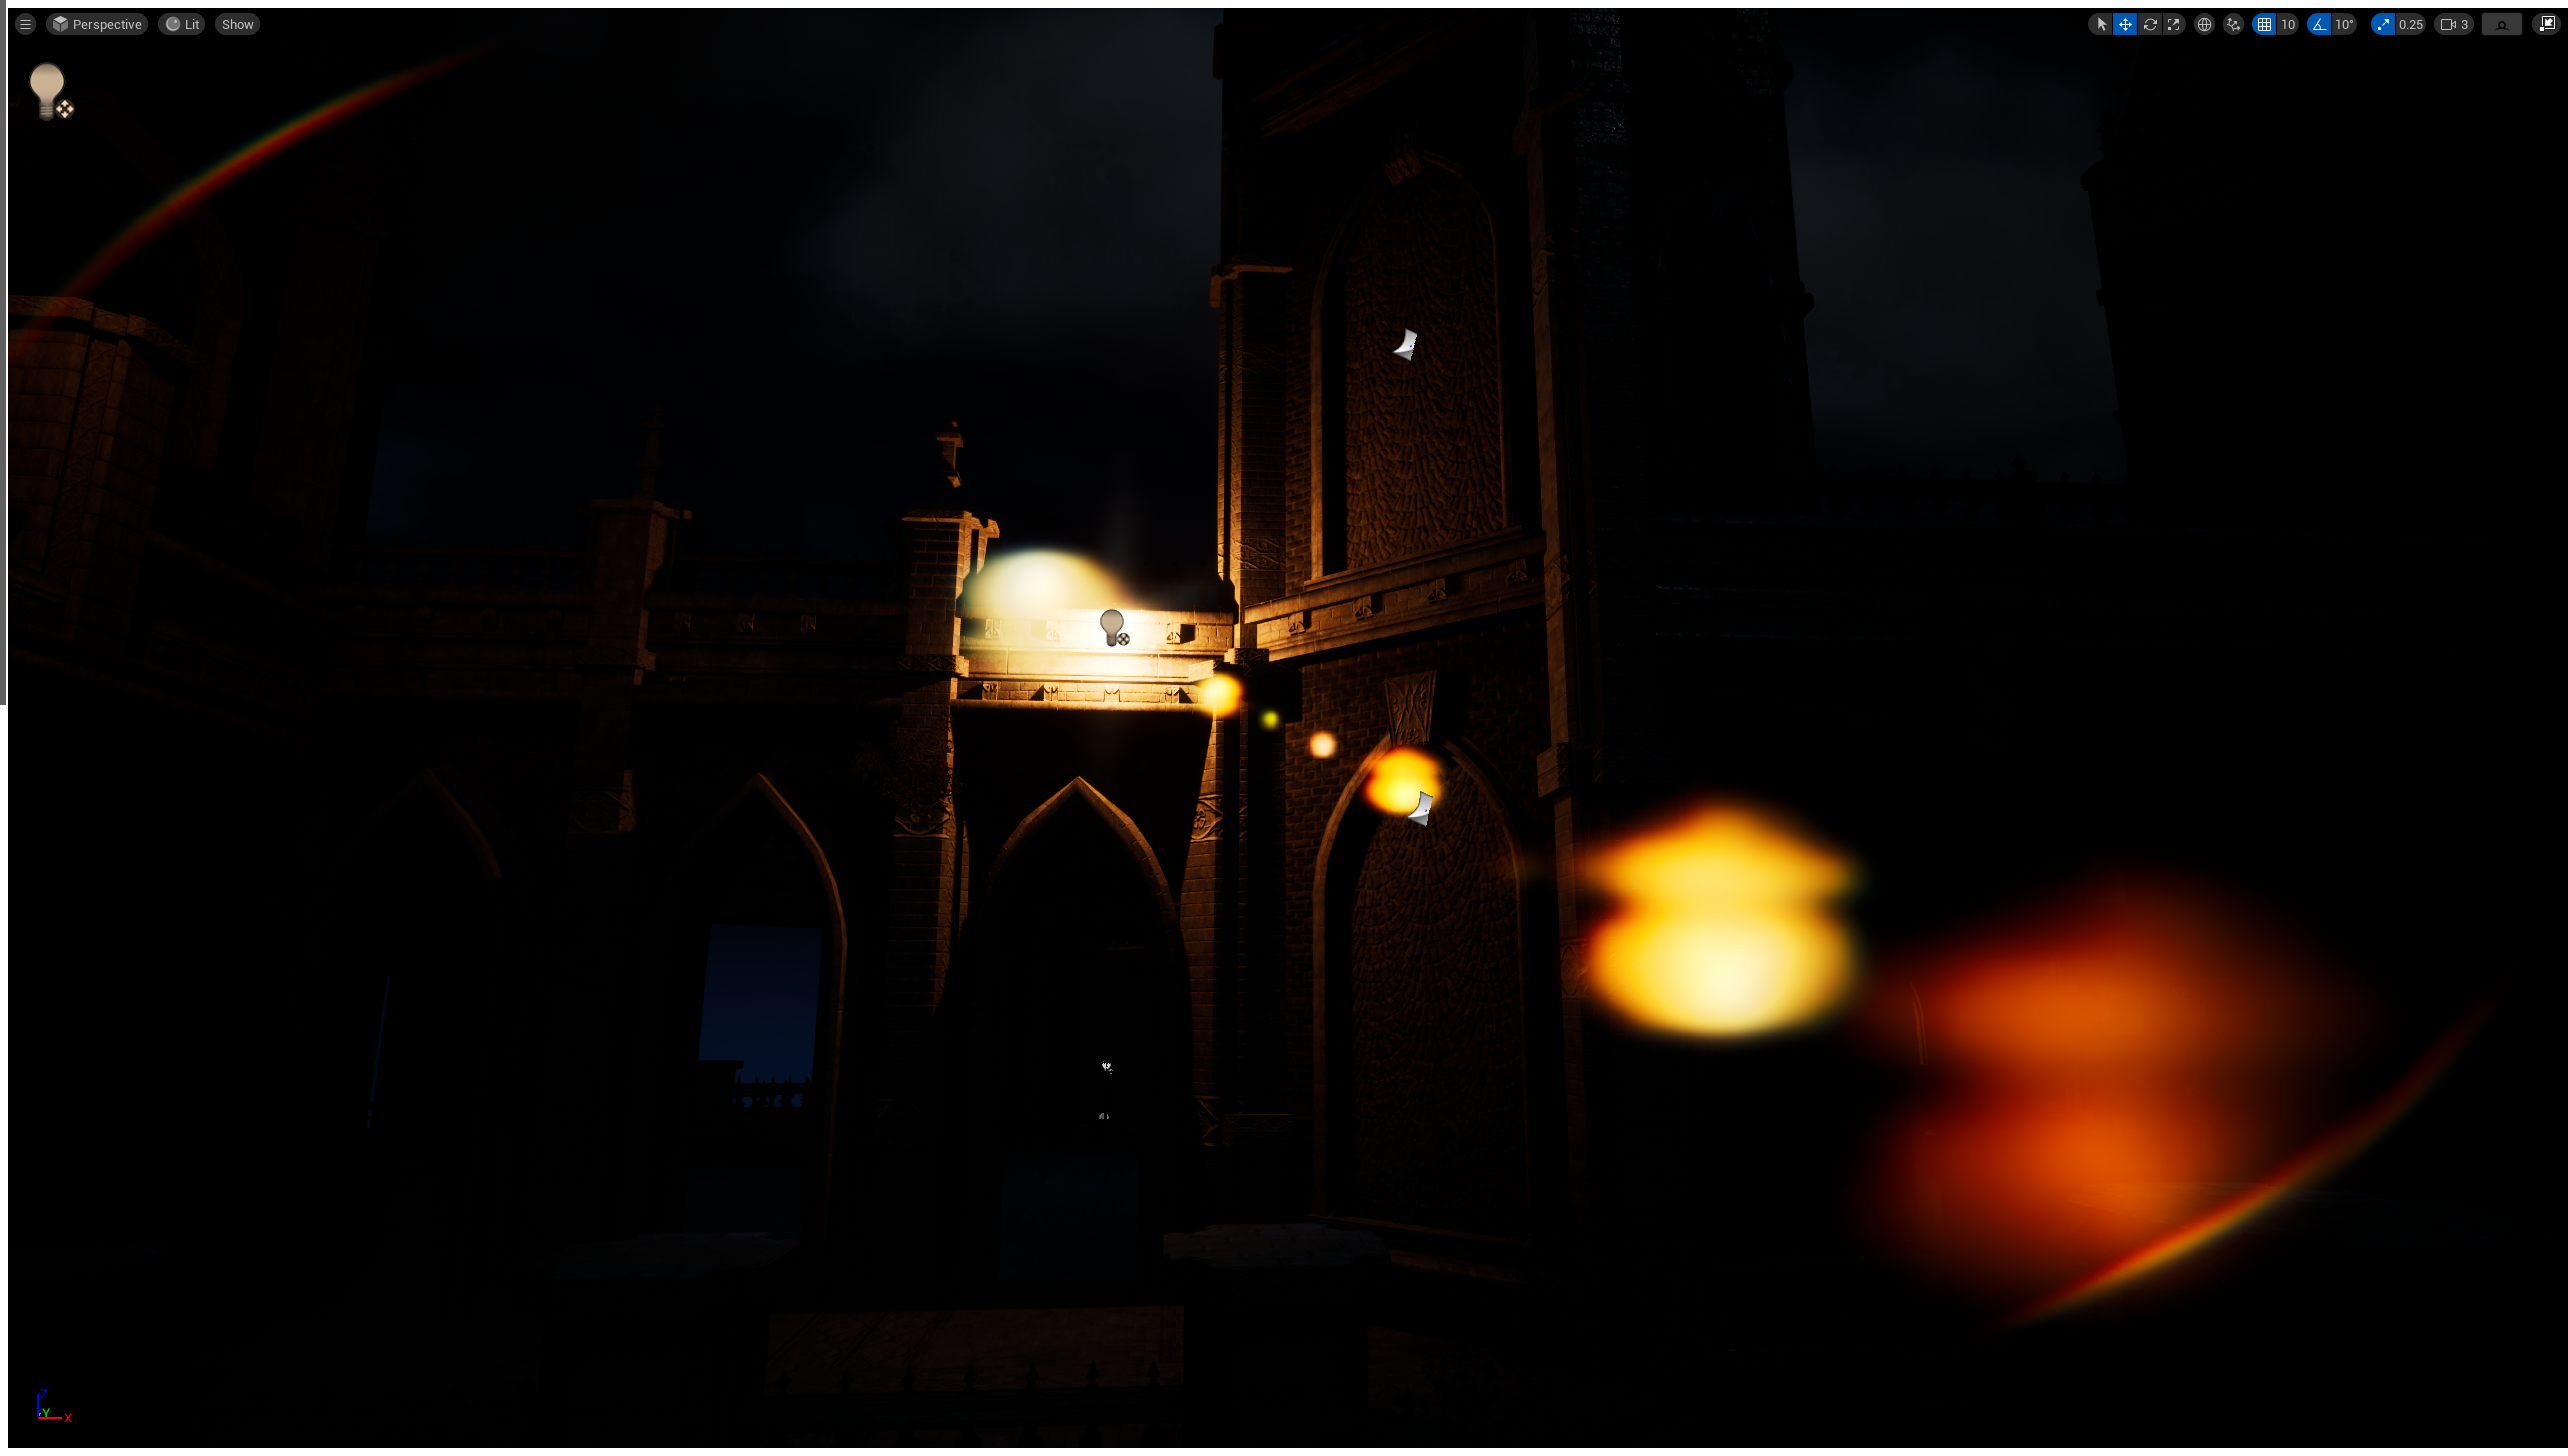
기존 렌즈 플레어
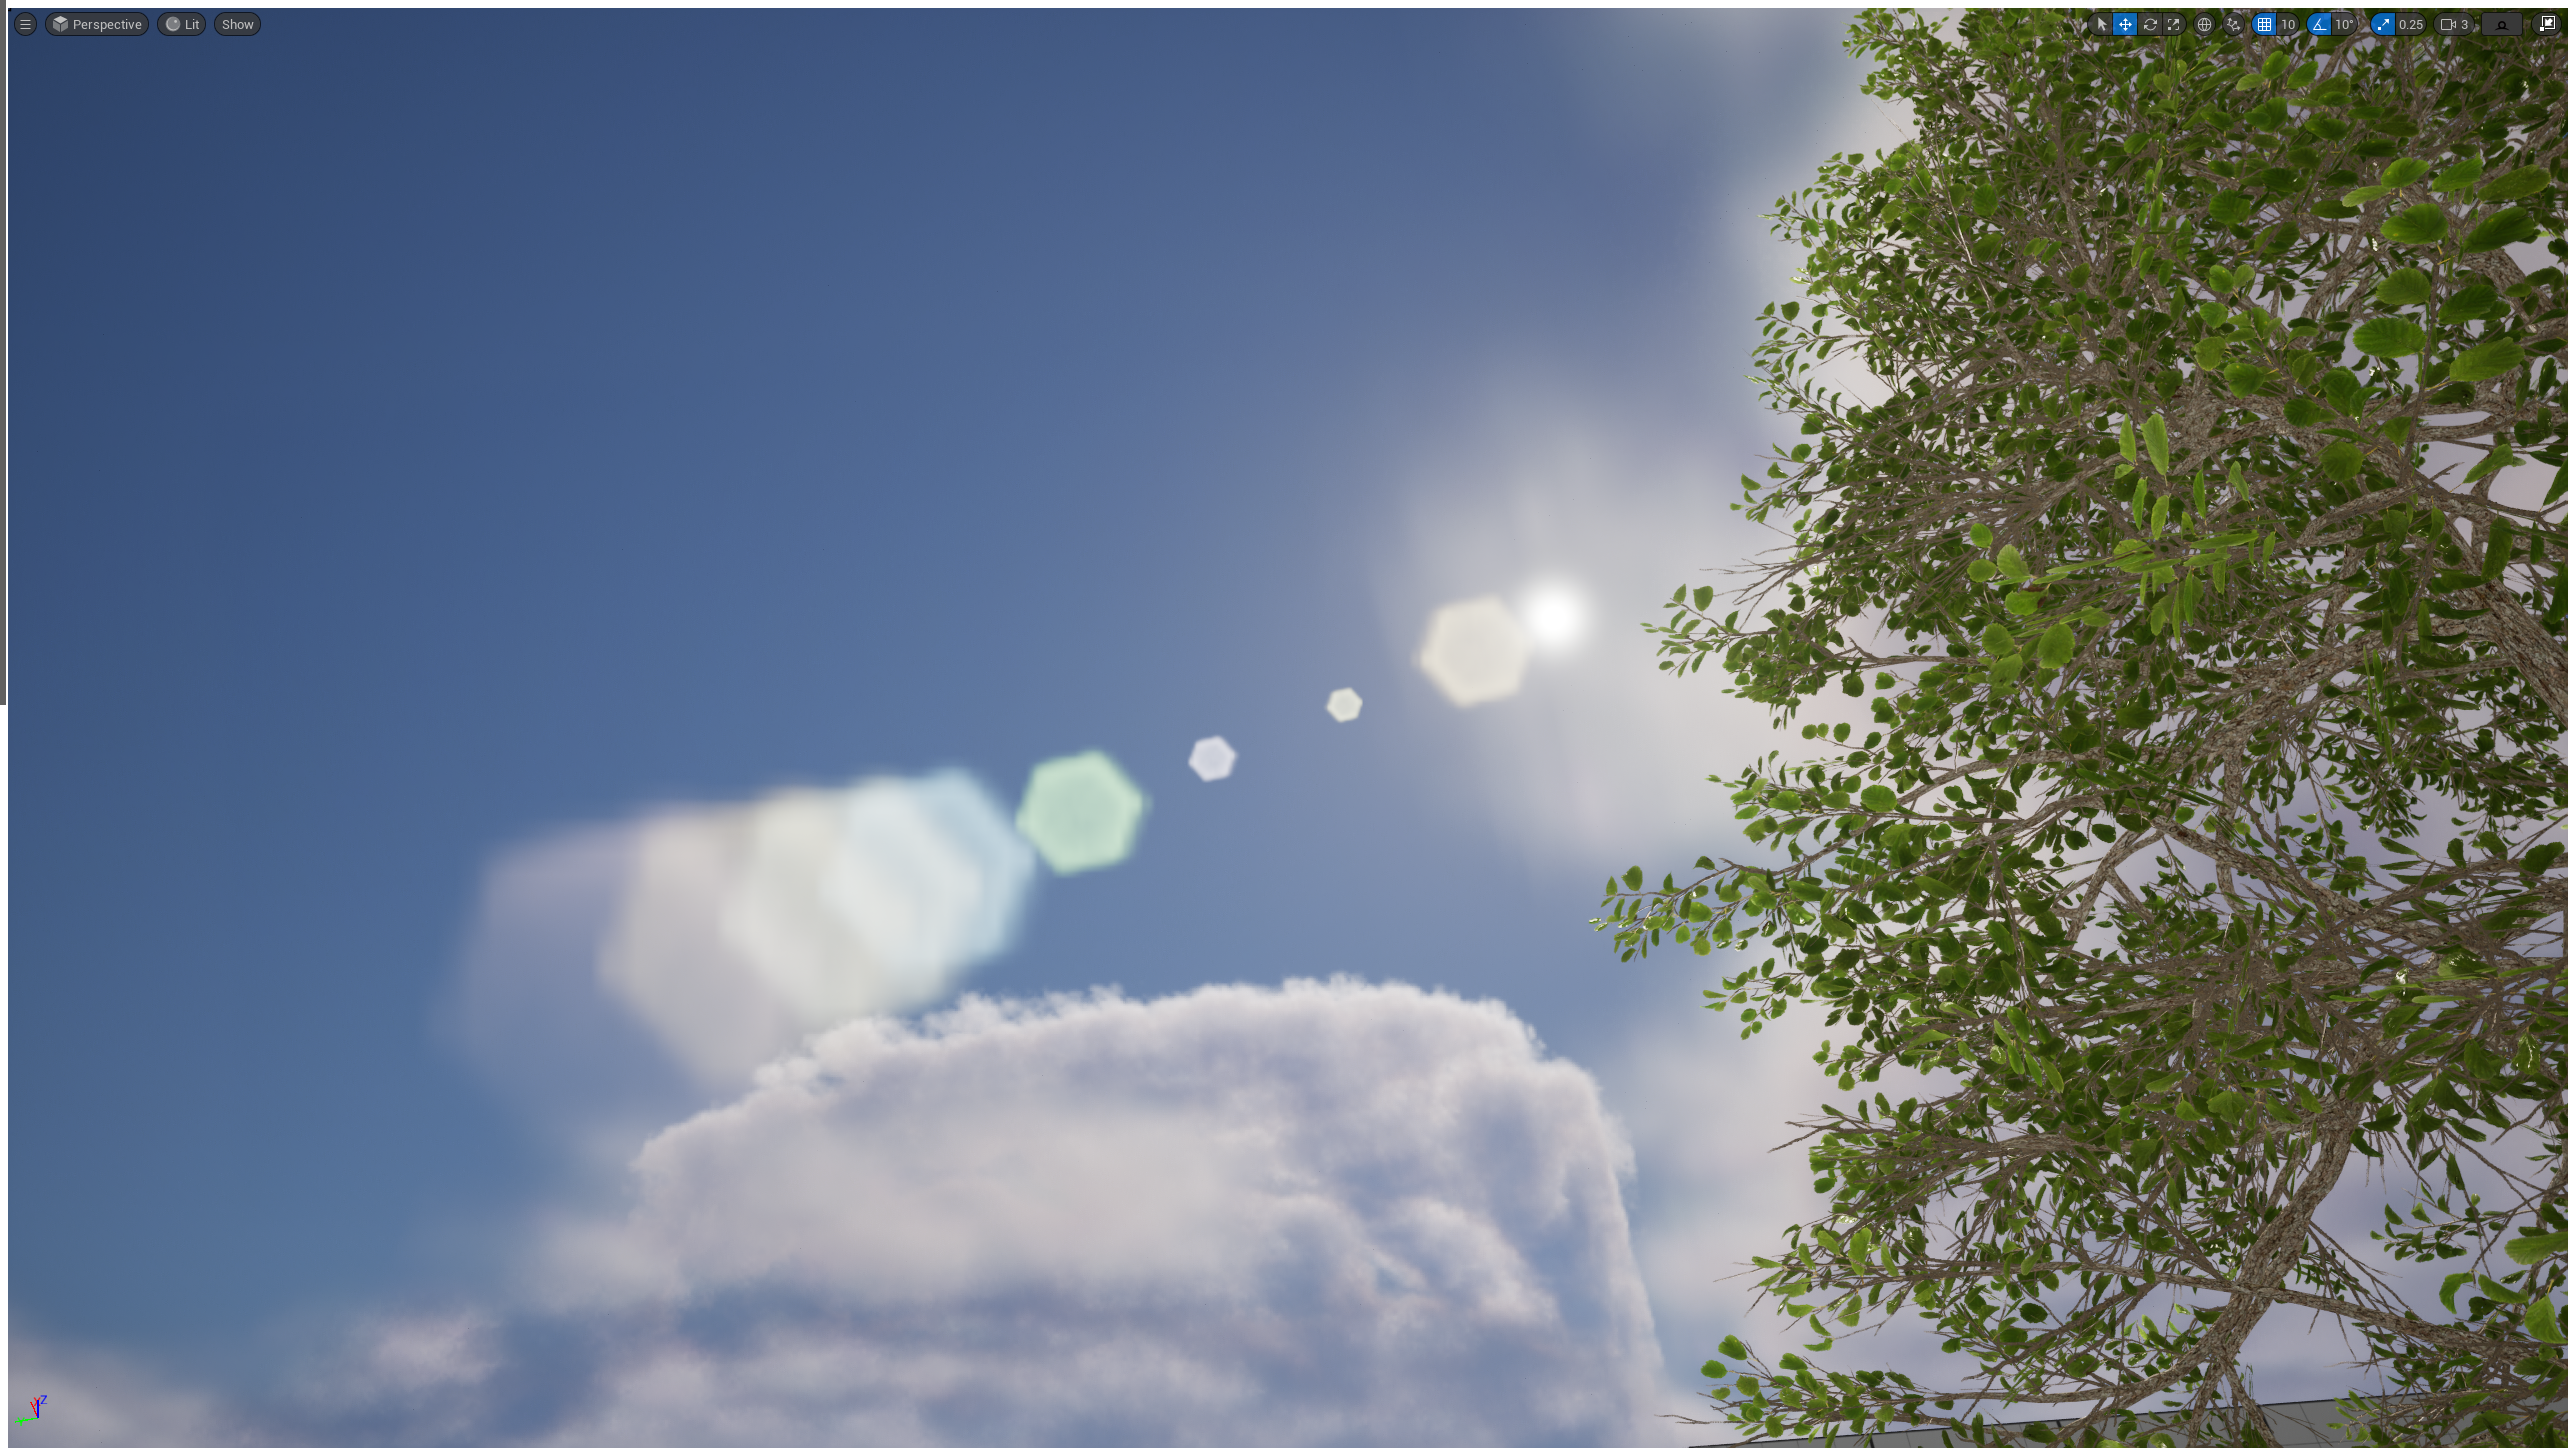
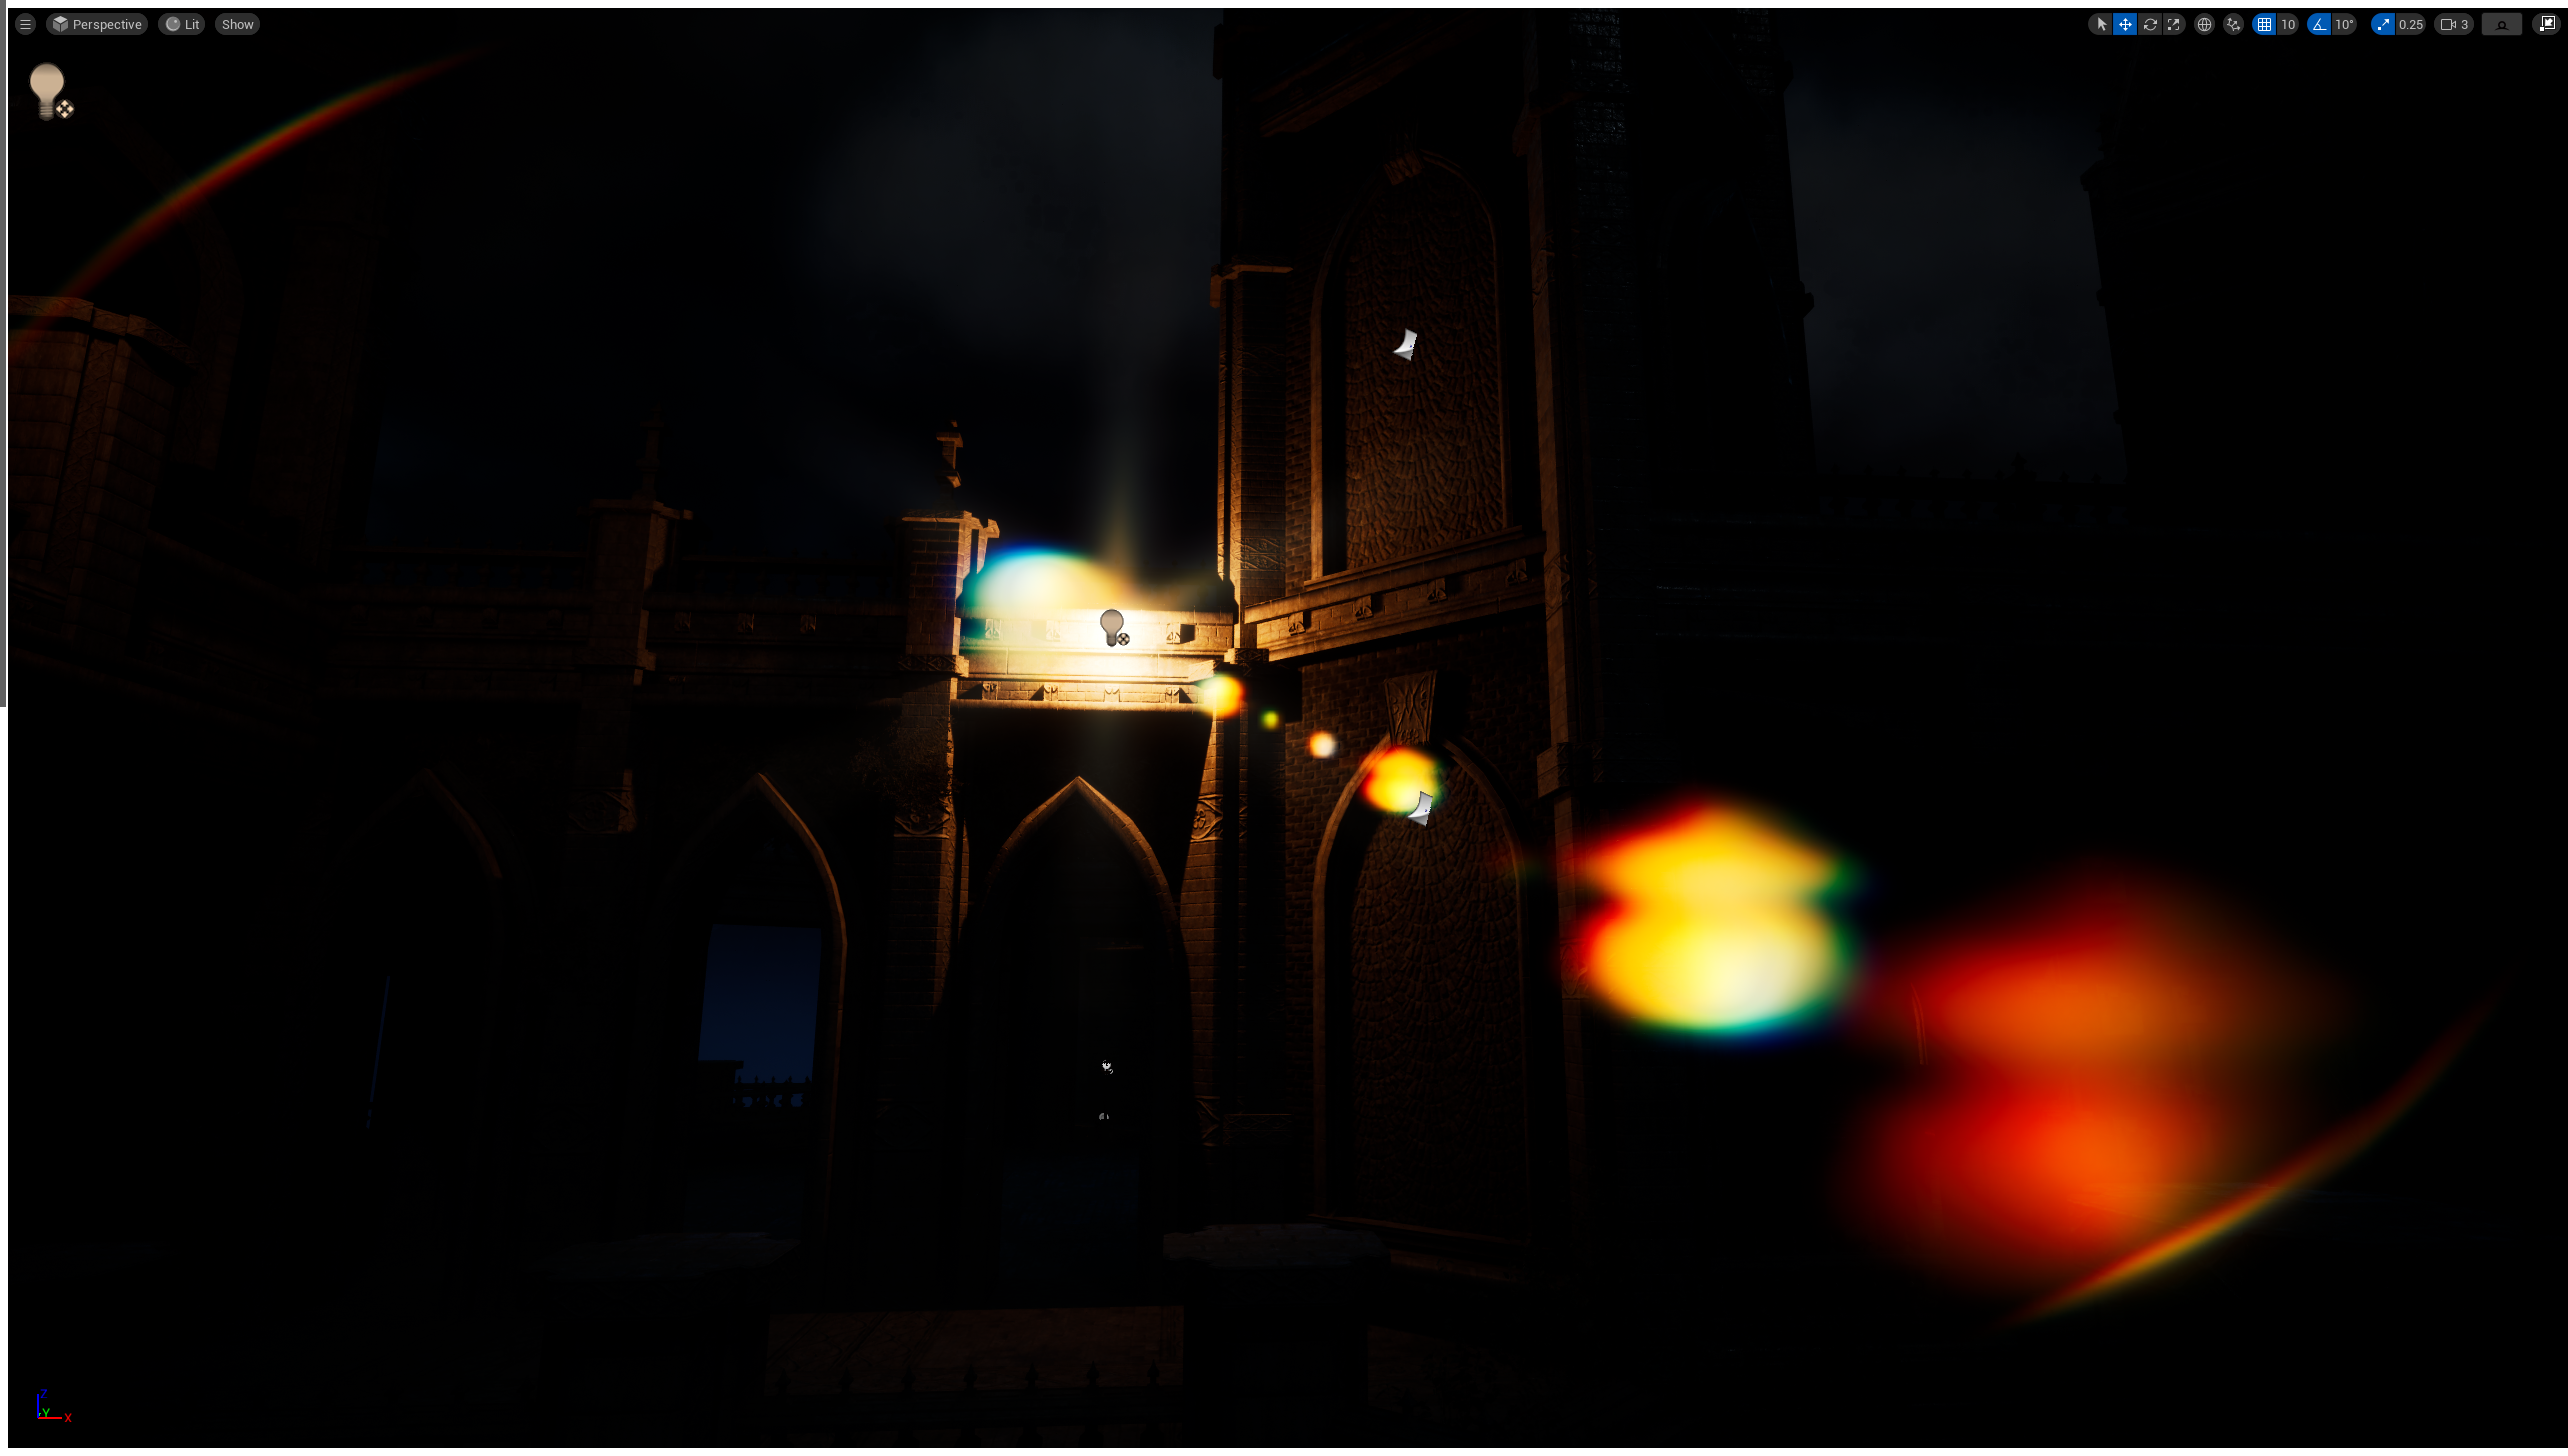
커스텀 렌즈 플레어
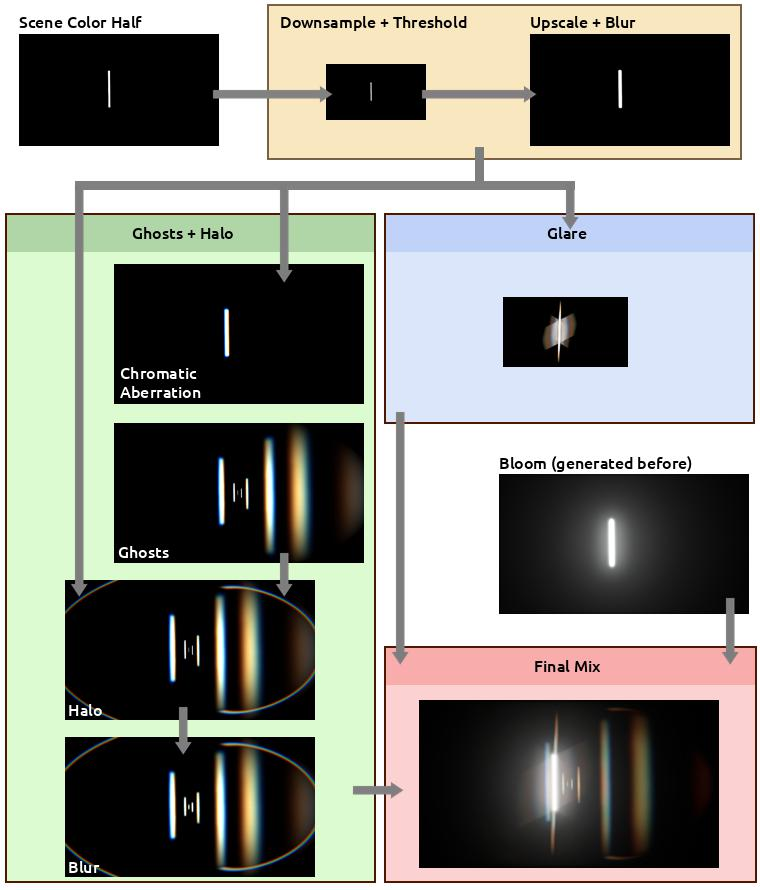
Overview of the Custom Lens Flare Pass
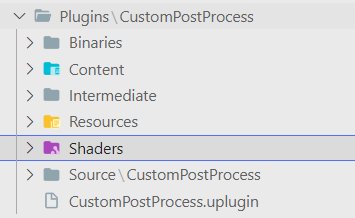
1. Setting Up a Plugin
새 플러그인을 만들어 준다. 다른 설정은 마음대로 해되, Is Engine Plugin은 체크해제 하도록 하자.
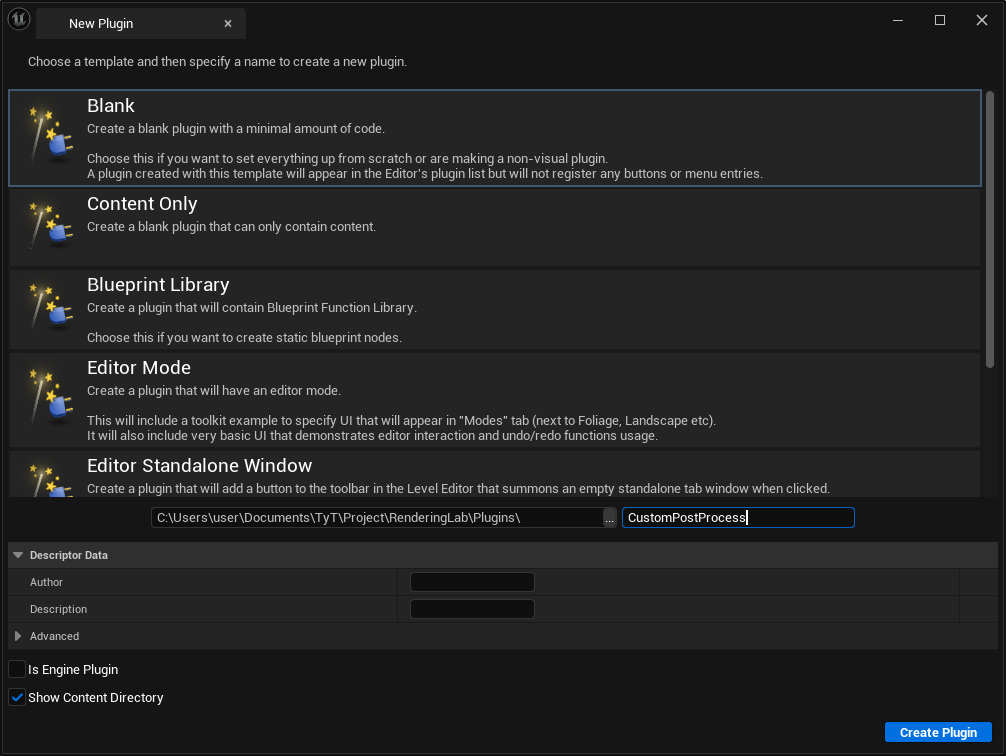
여기서 부터 플러그인의 이름을 CustomPostProcess로 하여 글을 진행한다.
생성한 플러그인의 Bulid.cs파일(위 사진대로면 CustomPostProcess.Build.cs)에 아래 include를 추가해 준다.
PrivateIncludePaths.AddRange(
	new string[] {
		// ... add other private include paths required here ...
		EngineDirectory + "/Source/Runtime/Renderer/Private"
    }
	);


PublicDependencyModuleNames.AddRange(
	new string[]
	{
		"Core",
		// ... add other public dependencies that you statically link with here ...
		"RHI",
		"Renderer",
		"RenderCore",
		"Projects"
	}
	);
기본으로 생성된 CustomPostProcess.h, CustomPostProcess.cpp가 있는데, 소스 코드의 함수에 아래 내용을 추가해 준다.
void FCustomPostProcessModule::StartupModule()
{
	FString BaseDir = IPluginManager::Get().FindPlugin(TEXT("CustomPostProcess"))->GetBaseDir();
	FString PluginShaderDir = FPaths::Combine(BaseDir, TEXT("Shaders"));
	AddShaderSourceDirectoryMapping(TEXT("/CustomShaders"), PluginShaderDir);
}
StartupModeul()에서 플러그인 위치를 검색해 새로 생성한 Shaders폴더를 추가한다. 그리고 AddShaderSourceDirectoryMapping()을 호출해 엔진이 사용자 정의 셰이더 파일을 로드하기위해 어디를 찾아야 하는지 알 수 있도록 심볼릭 경로를 생성한다.
마지막으로 CustomPostProcess.uplugin파일에서 모듈 속성을 아래와 같이 설정해 준다.
"Modules": [
	{
		"Name": "CustomPostProcess",
		"Type": "Runtime",
		"LoadingPhase": "PostConfigInit"
	}
]
2. Prepping Shaders
플러그인 루트폴더에 Shaders폴더를 새로 만들어 준다.
렌더링 패스로 통과시킬 커스텀 셰이더파일들을 저장할 폴더다. 아래 파일들을 생성해 준다.
.USF
- Chroma.usf
- DownsampleThreshold.usf
- DualKawaseBlur.usf
- Ghosts.usf
- Glare.usf
- Mix.usf
- Halo.usf
- Rescale.usf
- ScreenPass.usf
.USH
- Shared.ush
Shared.ush에 아래 코드를 넣어준다.
// Not sure if this one is needed, but the engine
// lens-flare shaders have it too.
#define SCENE_TEXTURES_DISABLED 1

#include "/Engine/Public/Platform.ush"
#include "/Engine/Private/Common.ush"
#include "/Engine/Private/ScreenPass.ush"
#include "/Engine/Private/PostProcessCommon.ush"

Texture2D InputTexture;
SamplerState InputSampler;
float2 InputViewportSize;
위 코드들은 공용 변수들이며, 모든 패스에서 사용될 편수들이다. 다른 파일은 뒤에 다루도록 한다.
3. Data Asset
해당 글에서 렌즈 플레어는 데이터 에셋과 콘솔 변수로 관리된다. 먼저 데이터 에셋부터 설정한다.
DataAsset을 상속하는 새로운 클래스를 만들어 준다.
PostProcessLensFlareAsset.h
// Fill out your copyright notice in the Description page of Project Settings.

#pragma once

#include "CoreMinimal.h"
#include "Engine/DataAsset.h"
#include "PostProcessLensFlareAsset.generated.h"

USTRUCT(BlueprintType)
struct FLensFlareGhostSettings
{
    GENERATED_BODY()

    UPROPERTY(EditAnywhere, BlueprintReadWrite, Category = "Exedre")
    FLinearColor Color = FLinearColor::White;

    UPROPERTY(EditAnywhere, BlueprintReadWrite, Category = "Exedre")
    float Scale = 1.0f;
};

UCLASS()
class CUSTOMPOSTPROCESS_API UPostProcessLensFlareAsset : public UDataAsset
{
	GENERATED_BODY()
public:
    UPROPERTY(EditAnywhere, Category = "General", meta = (UIMin = "0.0", UIMax = "10.0"))
    float Intensity = 1.0f;

    UPROPERTY(EditAnywhere, Category = "General")
    FLinearColor Tint = FLinearColor(1.0f, 0.85f, 0.7f, 1.0f);

    UPROPERTY(EditAnywhere, Category = "General")
    UTexture2D* Gradient = nullptr;


    UPROPERTY(EditAnywhere, Category = "Threshold", meta = (UIMin = "0.0", UIMax = "10.0"))
    float ThresholdLevel = 1.0f;

    UPROPERTY(EditAnywhere, Category = "Threshold", meta = (UIMin = "0.01", UIMax = "10.0"))
    float ThresholdRange = 1.0f;


    UPROPERTY(EditAnywhere, Category = "Ghosts", meta = (UIMin = "0.0", UIMax = "1.0"))
    float GhostIntensity = 1.0f;

    UPROPERTY(EditAnywhere, Category = "Ghosts", meta = (UIMin = "0.0", UIMax = "1.0"))
    float GhostChromaShift = 0.015f;

    UPROPERTY(EditAnywhere, Category = "Ghosts")
    FLensFlareGhostSettings Ghost1 = { FLinearColor(1.0f, 0.8f, 0.4f, 1.0f), -1.5 };

    UPROPERTY(EditAnywhere, Category = "Ghosts")
    FLensFlareGhostSettings Ghost2 = { FLinearColor(1.0f, 1.0f, 0.6f, 1.0f),  2.5 };

    UPROPERTY(EditAnywhere, Category = "Ghosts")
    FLensFlareGhostSettings Ghost3 = { FLinearColor(0.8f, 0.8f, 1.0f, 1.0f), -5.0 };

    UPROPERTY(EditAnywhere, Category = "Ghosts")
    FLensFlareGhostSettings Ghost4 = { FLinearColor(0.5f, 1.0f, 0.4f, 1.0f), 10.0 };

    UPROPERTY(EditAnywhere, Category = "Ghosts")
    FLensFlareGhostSettings Ghost5 = { FLinearColor(0.5f, 0.8f, 1.0f, 1.0f),  0.7 };

    UPROPERTY(EditAnywhere, Category = "Ghosts")
    FLensFlareGhostSettings Ghost6 = { FLinearColor(0.9f, 1.0f, 0.8f, 1.0f), -0.4 };

    UPROPERTY(EditAnywhere, Category = "Ghosts")
    FLensFlareGhostSettings Ghost7 = { FLinearColor(1.0f, 0.8f, 0.4f, 1.0f), -0.2 };

    UPROPERTY(EditAnywhere, Category = "Ghosts")
    FLensFlareGhostSettings Ghost8 = { FLinearColor(0.9f, 0.7f, 0.7f, 1.0f), -0.1 };


    UPROPERTY(EditAnywhere, Category = "Halo", meta = (UIMin = "0.0", UIMax = "1.0"))
    float HaloIntensity = 1.0f;

    UPROPERTY(EditAnywhere, Category = "Halo", meta = (UIMin = "0.0", UIMax = "1.0"))
    float HaloWidth = 0.6f;

    UPROPERTY(EditAnywhere, Category = "Halo", meta = (UIMin = "0.0", UIMax = "1.0"))
    float HaloMask = 0.5f;

    UPROPERTY(EditAnywhere, Category = "Halo", meta = (UIMin = "0.0", UIMax = "1.0"))
    float HaloCompression = 0.65f;

    UPROPERTY(EditAnywhere, Category = "Halo", meta = (UIMin = "0.0", UIMax = "1.0"))
    float HaloChromaShift = 0.015f;


    UPROPERTY(EditAnywhere, Category = "Glare", meta = (UIMin = "0", UIMax = "10"))
    float GlareIntensity = 0.02f;

    UPROPERTY(EditAnywhere, Category = "Glare", meta = (UIMin = "0.01", UIMax = "200"))
    float GlareDivider = 60.0f;

    UPROPERTY(EditAnywhere, Category = "Glare", meta = (UIMin = "0.0", UIMax = "10.0"))
    FVector GlareScale = FVector(1.0f, 1.0f, 1.0f);

    UPROPERTY(EditAnywhere, Category = "Glare")
    FLinearColor GlareTint = FLinearColor(1.0f, 1.0f, 1.0f, 1.0f);

    UPROPERTY(EditAnywhere, Category = "Glare")
    UTexture2D* GlareLineMask = nullptr;
};
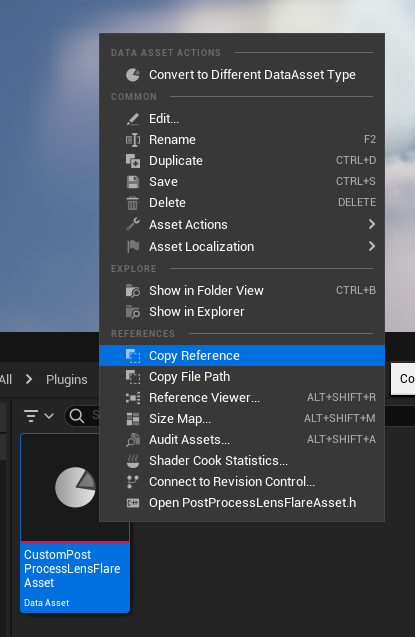
에디터에서, 데이터 에셋을 만들어 주자.
그리고 후에 설정하게 될 에셋 패스는 아래와 같이 Copy Reference를 활용해서 하면 된다.
4. 엔진 렌더링 패스 수정
PostProcessLensFlares.h파일에서, struct FLensFlareInputs에 새로운 파라미터를 추가해 준다. 이 구조체는 포스트 프로세스 렌더링 단계에서 렌더링 패스 자체로 몇 가지 설정을 전송하는데 사용된다.
struct FLensFlareInputs
{
	static const uint32 LensFlareCountMax = 8;

	// [Required] The bloom convolution texture. If enabled, this will be composited with lens flares. Otherwise,
	// a transparent black texture is used instead. Either way, the final output texture will use the this texture
	// descriptor and viewport.
	FScreenPassTexture Bloom;

	// TyT
	// Scene color at half resolution
	FScreenPassTexture HalfSceneTexture;

	// [Required] The scene color input, before bloom, which is used as the source of lens flares.
	// This can be a downsampled input based on the desired quality level.
	FScreenPassTexture Flare;
	[...]
}
이 구조체 바로 아래에, 새로운 구조체를 만들어 준다.
// TyT
struct FLensFlareOutputsData
{
	FRDGTextureRef Texture;
	FIntRect Rect;
};
// TyT
이 구조체는 커스텀 코드에서 포스트 프로세스 렌더링 패스로 데이터를 보내는데 사용된다.
그리고 마지막으로 AddLensFlaresPass() 함수에 파라미터를 추가해 준다.
// Helper function which pulls inputs from the post process settings of the view.
FScreenPassTexture AddLensFlaresPass(
	FRDGBuilder& GraphBuilder,
	const FViewInfo& View,
	FScreenPassTexture Bloom,
	FScreenPassTexture HalfSceneColor,	// TyT
	const FSceneDownsampleChain& SceneDownsampleChain);
이제 PostProcessing.cpp에서 AddLensFlaresPass()를 호출하는 부분을 수정해 준다.
if (bLensFlareEnabled)
{
	Bloom = AddLensFlaresPass(GraphBuilder, View, Bloom, HalfResSceneColor, *LensFlareSceneDownsampleChain);	// TyT
}
PostProcessLensFlares.cpp의 최상단부 #include 밑에, 아래 코드를 추가해 delegate를 선언해 준다.
// TyT
DECLARE_MULTICAST_DELEGATE_FourParams(FPP_LensFlares, FRDGBuilder&, const FViewInfo&, const FLensFlareInputs&, FLensFlareOutputsData&);
RENDERER_API FPP_LensFlares PP_LensFlares;
// TyT
비교를 용의하게 하기 위해, 콘솔 변수를 추가해 이전 버전의 렌즈 플레어와 커스텀 렌즈 플레어를 변환 가능하게 설정한다.
TAutoConsoleVariable<int32> CVarLensFlareQuality(
	TEXT("r.LensFlareQuality"),
	2,
	TEXT(" 0: off but best for performance\n")
	TEXT(" 1: low quality with good performance\n")
	TEXT(" 2: good quality (default)\n")
	TEXT(" 3: very good quality but bad performance"),
	ECVF_Scalability | ECVF_RenderThreadSafe);

// TyT
// Console var to switch between the lens-flare methods
TAutoConsoleVariable<int32> CVarLensFlareMethod(
	TEXT("r.LensFlareMethod"),
	1,
	TEXT(" 0: Original lens-flare method\n")
	TEXT(" 1: Custom lens-flare method"),
	ECVF_RenderThreadSafe);
// TyT
파일의 하단부에 AddLensFlaresPass() 함수에 파라미터를 추가해 주고, 함수를 수정해 준다.
FScreenPassTexture AddLensFlaresPass(
	FRDGBuilder& GraphBuilder,
	const FViewInfo& View,
	FScreenPassTexture Bloom,
	FScreenPassTextureInput HalfSceneColor,		// TyT
	const FSceneDownsampleChain& SceneDownsampleChain)
{
	[...]

	FLensFlareInputs LensFlareInputs;
	LensFlareInputs.Bloom = Bloom;
	LensFlareInputs.HalfSceneColor = HalfSceneColor;	// TyT
	LensFlareInputs.Flare = SceneDownsampleChain.GetTexture(LensFlareDownsampleStageIndex);

	[...]

	// If a bloom output texture isn't available, substitute the half resolution scene color instead, but disable bloom
	// composition. The pass needs a primary input in order to access the image descriptor and viewport for output.
	if (!Bloom.IsValid())
	{
		LensFlareInputs.Bloom = SceneDownsampleChain.GetFirstTexture();
		LensFlareInputs.bCompositeWithBloom = false;
	}

	// TyT
	int32 UseCustomFlare = CVarLensFlareMethod.GetValueOnRenderThread();

	FLensFlareOutputsData Outputs;
	Outputs.Texture = nullptr;
	Outputs.Rect = FIntRect(0, 0, 0, 0);

	if (UseCustomFlare != 0)
	{
		PP_LensFlares.Broadcast(GraphBuilder, View, LensFlareInputs, Outputs);
	}

	if (UseCustomFlare == 0 || Outputs.Texture == nullptr)
	{
		return AddLensFlaresPass(GraphBuilder, View, LensFlareInputs);
	}
	else
	{
		return FScreenPassTexture(Outputs.Texture, Outputs.Rect);
	}
	//return AddLensFlaresPass(GraphBuilder, View, LensFlareInputs);
	// TyT
위 코드는 다음과 같은 일을 한다.
- cvar value를 얻는다.(콘솔 변수)
- 렌즈 플레어 패스 결과를 위한 구조체를 생성한다.
- cvar이 0이 아니면, 델리게이트에 연결된 함수를 실행하도록 요청한다.
- cvar이 0이거나 델리게이트에서 invalid한 값이 return되면, 기존 렌즈 플레어 패스를 실행한다.
- 그 외에는 커스텀 렌즈 플레어 패스의 결과를 기반으로 특수한 텍스처를 반환한다.
디버그 목적으로 이전 버전과 커스텀 버전을 둘다 가능하게 만들었지만, 사용되지도 않는 셰이더 컴파일 등 최적화에 문제가 있으니 기존 버전을 제거하는 것이 도움이 될 수도 있음
5. Custom Subsystem
서브시스템은 엔진 자체에서 관리되는 싱글톤으로, 게임 코드 어디서든 쉽게 검색이 가능함. 그중 엔진 서브시스템은 엔진이 시작되고 종료될 때 함께 시작되고 중지된다.
플러그인에서 EngineSubsystem을 상속하는 새 클래스를 만든다.
PostProcessSubsystem.h
#pragma once

#include "CoreMinimal.h"
#include "Subsystems/EngineSubsystem.h"
#include "PostProcess/PostProcessLensFlares.h"
#include "PostProcessSubsystem.generated.h"

DECLARE_MULTICAST_DELEGATE_FourParams(FPP_LensFlares, FRDGBuilder&, const FViewInfo&, const FLensFlareInputs&, FLensFlareOutputsData&);
extern RENDERER_API FPP_LensFlares PP_LensFlares;

class UPostProcessLensFlareAsset;

UCLASS()
class CUSTOMPOSTPROCESS_API UPostProcessSubsystem : public UEngineSubsystem
{
	GENERATED_BODY()

public:
    // Init function to setup the delegate and load the data asset
    virtual void Initialize(FSubsystemCollectionBase& Collection) override;

    // Used for cleanup
    virtual void Deinitialize() override;

private:
    // The reference to the data asset storing the settings
    UPROPERTY(Transient)
    UPostProcessLensFlareAsset* PostProcessAsset;

    // Called by engine delegate Render Thread
    void RenderLensFlare(
        FRDGBuilder& GraphBuilder,
        const FViewInfo& View,
        const FLensFlareInputs& Inputs,
        FLensFlareOutputsData& Outputs
    );

    // Threshold prender pass
    FRDGTextureRef RenderThreshold(
        FRDGBuilder& GraphBuilder,
        FRDGTextureRef InputTexture,
        FIntRect& InputRect,
        const FViewInfo& View
    );

    // Ghosts + Halo render pass
    FRDGTextureRef RenderFlare(
        FRDGBuilder& GraphBuilder,
        FRDGTextureRef InputTexture,
        FIntRect& InputRect,
        const FViewInfo& View
    );

    // Glare render pass
    FRDGTextureRef RenderGlare(
        FRDGBuilder& GraphBuilder,
        FRDGTextureRef InputTexture,
        FIntRect& InputRect,
        const FViewInfo& View
    );

    // Sub-pass for blurring
    FRDGTextureRef RenderBlur(
        FRDGBuilder& GraphBuilder,
        FRDGTextureRef InputTexture,
        const FViewInfo& View,
        const FIntRect& Viewport,
        int BlurSteps
    );

    // Cached blending and sampling states
    // which are re-used across render passes
    FRHIBlendState* ClearBlendState = nullptr;
    FRHIBlendState* AdditiveBlendState = nullptr;

    FRHISamplerState* BilinearClampSampler = nullptr;
    FRHISamplerState* BilinearBorderSampler = nullptr;
    FRHISamplerState* BilinearRepeatSampler = nullptr;
    FRHISamplerState* NearestRepeatSampler = nullptr;
};
- 엔진의 버전과 연결하기 위해 델리게이트를 다시 선언. 그 다음 줄에서 extern 정의를 통해 객체를 선언
UPostProcessLensFlareAsset전방선언Initialize()와Deinitialize()은 서브시스템의 기본 함수. 몇가지 설정을 위해 오버라이딩 해준다.PostProcessAsset은 콘텐츠 브라우저에서 가져올 렌더링 매개변수에 대한 참조.RenderLensFlare(), RenderThreshold(), RenderFlare(), RenderGlare() RenderBlur()는 각각 다른 패스를 렌더링하는 데 사용할 다양한 렌더링 함수.- FRHIBlendState와 FRHISamplerState는 다양한 패스에서 사용될 여러 매개변수.
PostProcessSubsystem.cpp
#include "PostProcessSubsystem.h"
#include "PostProcessLensFlareAsset.h"

#include "RenderGraph.h"
#include "ScreenPass.h"
#include "PostProcess/PostProcessLensFlares.h"
#include "DataDrivenShaderPlatformInfo.h"
#include "SceneRendering.h"

namespace
{
    // TODO_SHADER_SCREENPASS

    // TODO_SHADER_RESCALE

    // TODO_SHADER_DOWNSAMPLE

    // TODO_SHADER_KAWASE

    // TODO_SHADER_CHROMA

    // TODO_SHADER_GHOSTS

    // TODO_SHADER_HALO

    // TODO_SHADER_GLARE

    // TODO_SHADER_MIX
}

void UPostProcessSubsystem::Initialize( FSubsystemCollectionBase& Collection )
{
    Super::Initialize( Collection );

    //--------------------------------
    // Delegate setup
    //--------------------------------
    FPP_LensFlares::FDelegate Delegate = FPP_LensFlares::FDelegate::CreateLambda(
        [this]( FRDGBuilder& GraphBuilder, const FViewInfo& View, const FLensFlareInputs& Inputs, FLensFlareOutputsData& Outputs )
    {
        RenderLensFlare(GraphBuilder, View, Inputs, Outputs);
    });

    ENQUEUE_RENDER_COMMAND(BindRenderThreadDelegates)([Delegate](FRHICommandListImmediate& RHICmdList)
    {
        PP_LensFlares.Add(Delegate);
    });

    //--------------------------------
    // Data asset loading
    //--------------------------------
    FString Path = "Copy Reference of My Asset";

    PostProcessAsset = LoadObject<UPostProcessLensFlareAsset>( nullptr, *Path );
    check(PostProcessAsset);
}

void UPostProcessSubsystem::Deinitialize()
{
    ClearBlendState = nullptr;
    AdditiveBlendState = nullptr;
    BilinearClampSampler = nullptr;
    BilinearBorderSampler = nullptr;
    BilinearRepeatSampler = nullptr;
    NearestRepeatSampler = nullptr;
}
namespace는 기존 엔진쪽과 출동 없이 전역 셰이더를 선언하는 데 사용됨. 여기서의 TODO는 다음 단계에서 작성됨.
Initialize()는 두가지 큰 작업을 수행함.
- delegate 설정이 이루어 진다. 엔진에 의해 브로드캐스트가 트리거될때 내부 함수가 호출되도록 정의하는 곳이다. 이는 람다를 사용해 델리게이트 객체를 빌드하고, ENQUEUE_RENDER_COMMAND를 사용하여 모든 것ㅇ르 등록하는 곳이다.
- 다음으로 데이터 에셋을 로드한다. 이 함수가 생성자의 일부가 아니기 때문에 FObjectFinder 대신, LoadObject() 도우미를 사용하여 에셋을 로드한다. 여기서 경로를 자신의 경로로 대체해야 한다.
여기서 델리게이트를 설정하고 연결하는 방법이 ThreadSafe하지 않을 수 있다는 말이 있다. 작성자가 직적 이 문제와 관련된 크래시를 보진 않았지만, 그대로 제품에 사용하긴 적합하지 않을 수 있다는 점에 유의하자.
이 문제에 대한 해결법으로 제안된 것은, 렌더링 코드를 서브 클래스로 이동하고CreateShared()로 만든 ThreadSafe한 포인터(TSharedPtr)에 저장하는 것이다.
6. Utility Functions
유틸리티 함수들은 PostProcessSubsystem.cpp에 그대로 작성되었다.(헤더x)
이 함수는 서브 영역 크기를 계산하고 버퍼를 다시 크기 조정하는 비율을 출력한다. 이것은 threshold패스중에 유용하다. 대부분의 코드는 엔진 자체에서 복사하여 붙여넣은 것.
FVector2D GetInputViewportSize( const FIntRect& Input, const FIntPoint& Extent )
{
    // Based on
    // GetScreenPassTextureViewportParameters()
    // Engine/Source/Runtime/Renderer/Private/ScreenPass.cpp

    FVector2D ExtentInverse = FVector2D(1.0f / Extent.X, 1.0f / Extent.Y);

    FVector2D RectMin = FVector2D(Input.Min);
    FVector2D RectMax = FVector2D(Input.Max);

    FVector2D Min = RectMin * ExtentInverse;
    FVector2D Max = RectMax * ExtentInverse;

    return (Max - Min);
}
다음은 가장 중요한 함수인데, 실제로 렌더 그래프에 등록될 draw다.
// The function that draw a shader into a given RenderGraph texture
template<typename TShaderParameters, typename TShaderClassVertex, typename TShaderClassPixel>
inline void DrawShaderPass(
        FRDGBuilder& GraphBuilder,
        const FString& PassName,
        TShaderParameters* PassParameters,
        TShaderMapRef<TShaderClassVertex> VertexShader,
        TShaderMapRef<TShaderClassPixel> PixelShader,
        FRHIBlendState* BlendState,
        const FIntRect& Viewport
    )
{
    const FScreenPassPipelineState PipelineState(VertexShader, PixelShader, BlendState);

    GraphBuilder.AddPass(
        FRDGEventName( TEXT("%s"), *PassName ),
        PassParameters,
        ERDGPassFlags::Raster,
        [PixelShader, PassParameters, Viewport, PipelineState] (FRHICommandListImmediate& RHICmdList)
    {
        RHICmdList.SetViewport(
            Viewport.Min.X, Viewport.Min.Y, 0.0f,
            Viewport.Max.X, Viewport.Max.Y, 1.0f
        );

        SetScreenPassPipelineState(RHICmdList, PipelineState);

        SetShaderParameters(
            RHICmdList,
            PixelShader,
            PixelShader.GetPixelShader(),
            *PassParameters
        );

        DrawRectangle(
            RHICmdList,                             // FRHICommandList
            0.0f, 0.0f,                             // float X, float Y
            Viewport.Width(),   Viewport.Height(),  // float SizeX, float SizeY
            Viewport.Min.X,     Viewport.Min.Y,     // float U, float V
            Viewport.Width(),                       // float SizeU
            Viewport.Height(),                      // float SizeV
            Viewport.Size(),                        // FIntPoint TargetSize
            Viewport.Size(),                        // FIntPoint TextureSize
            PipelineState.VertexShader,             // const TShaderRefBase VertexShader
            EDrawRectangleFlags::EDRF_Default       // EDrawRectangleFlags Flags
        );
    });
}
FScreenPassPipelineState: 렌더링 방법을 정의하는데 사용. 스텐실 마스크를 설정하는 데 사용될 수 있음. 지금은 블렌딩 모드를 변경하는 데만 사용.AddPass(): 이에 연결된 람다 함수를 통해 패스를 등록하는데 사용FRDGEventName(): 패스에 이름을 지정하는데 사용. 그래픽 디버거(ex. RenderDoc)에 표시됨.RHICmdList: RHI에 명령을 보내는 데 사용. 이 경우 SetViewport()를 사용해 대상 버퍼의 어느 영역이 그려질 지 정의함.SetShaderParameters(): 셰이더 매개변수는 미리 정의된 다음 이 함수를 통해 전달됨.DrawRectangle(): 최종 함수. 직접 메시 데이터를 구축하지 않고도 버퍼에 쿼드를 그릴 수 있도록 도와주는 함수. 전달된 모든 정보는 쿼드를 어디에 그리고 어느 크기로 그려야 하는지를 정의하는 데만 사용. 쿼드의 크기는 UV크기와 독립적이며, 예를 들어 버퍼의 하위 영역을 그릴 때 유용하다. 이 경우 쿼드 크기와 UV가 다르지 않다.(항상 전체 버퍼를 업데이트 하기 때문)
DrawRectangle()
이 함수는 SceneFilterRendering.cpp.에 정의되어 있고, SceneFilterRendering.h에 아래와 같이
위 코드에서 해당 함수를 사용하기 위해서, 헤더파일또는 소스코드에서 이 함수가 존재함을 알려주자.
extern RENDERER_API void DrawRectangle(
    FRHICommandList& RHICmdList,
    float X,
    float Y,
    float SizeX,
    float SizeY,
    float U,
    float V,
    float SizeU,
    float SizeV,
    FIntPoint TargetSize,
    FIntPoint TextureSize,
    const TShaderRef<FShader>& VertexShader,
    EDrawRectangleFlags Flags = EDRF_Default,
    uint32 InstanceCount = 1
);
7. 메인 렌더링 함수
먼저 몇가지 툴을 추가한다. 렌더링 프로세스 단계를 건너뛰는데 사용될 몇 가지 콘솔 변수를 추가한다. 그리고 DECLARE_GPU_STAT를 사용하여 새로운 GPU 통계 이벤트를 추가한다. 이를 통해 엔진의 라이브 GPU프로파일러를 통해 효과의 렌더링 시간을 볼 수 있다.
TAutoConsoleVariable<int32> CVarLensFlareRenderBloom(
    TEXT("r.LensFlare.RenderBloom"),
    1,
    TEXT(" 0: Don't mix Bloom into lens-flare\n")
    TEXT(" 1: Mix the Bloom into the lens-flare"),
    ECVF_RenderThreadSafe);

TAutoConsoleVariable<int32> CVarLensFlareRenderFlarePass(
    TEXT("r.LensFlare.RenderFlare"),
    1,
    TEXT(" 0: Don't render flare pass\n")
    TEXT(" 1: Render flare pass (ghosts and halos)"),
    ECVF_RenderThreadSafe);

TAutoConsoleVariable<int32> CVarLensFlareRenderGlarePass(
    TEXT("r.LensFlare.RenderGlare"),
    1,
    TEXT(" 0: Don't render glare pass\n")
    TEXT(" 1: Render flare pass (star shape)"),
    ECVF_RenderThreadSafe);

DECLARE_GPU_STAT(LensFlaresTyT)
이제 렌더링 함수로 넘어간다.
void UPostProcessSubsystem::RenderLensFlare(
    FRDGBuilder& GraphBuilder,
    const FViewInfo& View,
    const FLensFlareInputs& Inputs,
    FLensFlareOutputsData& Outputs
)
{
    check(Inputs.Bloom.IsValid());
    check(Inputs.HalfSceneColor.IsValid());

    if (PostProcessAsset == nullptr)
    {
        return;
    }

    RDG_GPU_STAT_SCOPE(GraphBuilder, LensFlaresTyT)
    RDG_EVENT_SCOPE(GraphBuilder, "LensFlaresTyT");
	[...]
}
check는 invaild data에 대해서는 렌더링 패스를 실행하지 않기 위해서다. 데이터 에셋 또한 vaild한지 체크해 준다.
그리고 GPU state event를 등록해 준다. 이 부분은 RenderLensFlare()가 실질적으로 렌더링 쓰레드에서 실행되기 때문에 이곳에 작성해 준다.
다음은 몇몇 변수를 설정하는데, 이 부분은 실제로 다른 렌더링 함수에서 사용되는 것을 재사용 하는 것 이다.
	[...]
	const FScreenPassTextureViewport BloomViewport(Inputs.Bloom);
    const FVector2D BloomInputViewportSize = GetInputViewportSize( BloomViewport.Rect, BloomViewport.Extent );

    const FScreenPassTextureViewport SceneColorViewport(Inputs.HalfSceneColor);
    const FVector2D SceneColorViewportSize = GetInputViewportSize( SceneColorViewport.Rect, SceneColorViewport.Extent );

    // Input
    FRDGTextureRef InputTexture = Inputs.HalfSceneColor.Texture;
    FIntRect InputRect = SceneColorViewport.Rect;

    // Outputs
    FRDGTextureRef OutputTexture = Inputs.HalfSceneColor.Texture;
    FIntRect OutputRect = SceneColorViewport.Rect;

    // States
    if( ClearBlendState == nullptr )
    {
        // Blend modes from:
        // '/Engine/Source/Runtime/RenderCore/Private/ClearQuad.cpp'
        // '/Engine/Source/Runtime/Renderer/Private/PostProcess/PostProcessMaterial.cpp'
        ClearBlendState = TStaticBlendState<>::GetRHI();
        AdditiveBlendState = TStaticBlendState<CW_RGB, BO_Add, BF_One, BF_One>::GetRHI();

        BilinearClampSampler = TStaticSamplerState<SF_Bilinear, AM_Clamp, AM_Clamp, AM_Clamp>::GetRHI();
        BilinearBorderSampler = TStaticSamplerState<SF_Bilinear, AM_Border, AM_Border, AM_Border>::GetRHI();
        BilinearRepeatSampler = TStaticSamplerState<SF_Bilinear, AM_Wrap, AM_Wrap, AM_Wrap>::GetRHI();
        NearestRepeatSampler = TStaticSamplerState<SF_Point, AM_Wrap, AM_Wrap, AM_Wrap>::GetRHI();
    }

    // TODO_RESCALE

    ////////////////////////////////////////////////////////////////////////
    // Render passes
    ////////////////////////////////////////////////////////////////////////
    FRDGTextureRef ThresholdTexture = nullptr;
    FRDGTextureRef FlareTexture = nullptr;
    FRDGTextureRef GlareTexture = nullptr;

    ThresholdTexture = RenderThreshold(
        GraphBuilder,
        InputTexture,
        InputRect,
        View
    );

    if( CVarLensFlareRenderFlarePass.GetValueOnRenderThread() )
    {
        FlareTexture = RenderFlare(
            GraphBuilder,
            ThresholdTexture,
            InputRect,
            View
        );
    }

    if( CVarLensFlareRenderGlarePass.GetValueOnRenderThread() )
    {
        GlareTexture = RenderGlare(
            GraphBuilder,
            ThresholdTexture,
            InputRect,
            View
        );
    }

    // TODO_MIX

    ////////////////////////////////////////////////////////////////////////
    // Final Output
    ////////////////////////////////////////////////////////////////////////
    Outputs.Texture = OutputTexture;
    Outputs.Rect    = OutputRect;

} // End RenderLensFlare()
FScreenPassTextureViewport와 FVector2D는 입력 버퍼 속성을 계산하는 데 사용된다. 이를 FRDGTextureRef OutputTexture가 따라서 Outputs구조체에 저장되고 엔진으로 다시 전달되는 출력 텍스처다. FRDGTextureRef는 단순히 RDG 텍스처에 대한 포인터다.
다음은 다양한 States를 초기화 한다. 이들은 렌더 스레드를 통해서만 사용 가능한 RHI에 액세스 해야 하기 때문에 여기에서 초기화 된다.
나머지는 작성된 대로 렌더링 된다.
남은 렌더함수는 잠시 두고, 다음 단계로 넘어간다.
FRDGTextureRef UPostProcessSubsystem::RenderThreshold(
    FRDGBuilder& GraphBuilder,
    FRDGTextureRef InputTexture,
    FIntRect& InputRect,
    const FViewInfo& View
)
{
    // TODO_THRESHOLD

    // TODO_THRESHOLD_BLUR

    return FRDGTextureRef();
}

FRDGTextureRef UPostProcessSubsystem::RenderFlare(
    FRDGBuilder& GraphBuilder,
    FRDGTextureRef InputTexture,
    FIntRect& InputRect,
    const FViewInfo& View
)
{
    // TODO_FLARE_CHROMA

    // TODO_FLARE_GHOST

    // TODO_FLARE_HALO
    return FRDGTextureRef();
}

FRDGTextureRef UPostProcessSubsystem::RenderGlare(
    FRDGBuilder& GraphBuilder,
    FRDGTextureRef InputTexture,
    FIntRect& InputRect,
    const FViewInfo& View
)
{
    // TODO_GLARE
    return FRDGTextureRef();
}

FRDGTextureRef UPostProcessSubsystem::RenderBlur(
    FRDGBuilder& GraphBuilder,
    FRDGTextureRef InputTexture,
    const FViewInfo& View,
    const FIntRect& Viewport,
    int BlurSteps
)
{
    // TODO_BLUR
    return FRDGTextureRef();
}
8. Common Shader
이전 단계에서 남겨둔 TODO를 하나씩 해결한다
이제 common shader를 설정해야 한다. 버퍼에 렌더링 하기 위해 최소 버텍스, 픽셀 셰이더가 필요하다. 픽셀 셰이더는 다른 패스와는 좀 다르겠지만, 버텍스 셰이더는 대부분의 패스에 대해 거의 동일하다. 왜냐하면 단순히 사각형을 렌더링 하기 때문이다.
TODO_SHADER_SCREENPASS
// RDG buffer input shared by all passes
BEGIN_SHADER_PARAMETER_STRUCT(FCustomLensFlarePassParameters, )
    SHADER_PARAMETER_RDG_TEXTURE(Texture2D, InputTexture)
    RENDER_TARGET_BINDING_SLOTS()
END_SHADER_PARAMETER_STRUCT()

// The vertex shader to draw a rectangle.
class FCustomScreenPassVS : public FGlobalShader
{
public:
    DECLARE_GLOBAL_SHADER(FCustomScreenPassVS);

    static bool ShouldCompilePermutation(const FGlobalShaderPermutationParameters&)
    {
        return true;
    }

    FCustomScreenPassVS() = default;
    FCustomScreenPassVS(const ShaderMetaType::CompiledShaderInitializerType& Initializer)
        : FGlobalShader(Initializer)
    {}
};
IMPLEMENT_GLOBAL_SHADER(FCustomScreenPassVS, "/CustomShaders/ScreenPass.usf", "CustomScreenPassVS", SF_Vertex);     // CustomPostProcess.cpp에서 매핑한 경로가 /CustomShaders이므로 잘 확인하고 작성할 것
BEGIN_SHADER_PARAMETER_STRUCT매크로로 셰이더 파라미터를 정의한다. END_SHADER_PARAMETER_STRUCT가 나올때까지 연관된 속성 목록이다.
SHADER_PARAMETER_RDG_TEXTURE는 RDG버퍼를 위한 입력 텍스처다. 렌더 타겟이나 다른 텍스처2D는 다른 매크로를 사용한다. RENDER_TARGET_BINDING_SLOTS은 버퍼가 셰이더에 첨부될 수 있도록 보조 매개변수를 추가한다. 자세한 정보는
- Engine/Source/Runtime/RenderCore/Public/ShaderParameterMacros.h
에서 매크로 정의를 찾을 수 있다.
글로벌 셰이더는 기본적으로 FGlobalShader에서 상속된 C++클래스다. 그런 다음 셰이더 프로그램을 컴파일 하는 데 사용할 실제 HLSL 파일을 지정하기 위해 MPLEMENT_GLOBAL_SHADER매크로를 사용한다. 이 매크로는 네가지 인수를 갖는다.
- C++ 클래스: 바로 위에서 생성한 클래스
- 심볼릭 경로: 모듈에서 정의한 심볼릭 경로에 따른 usf파일의 위치
- 함수 이름: 로드하려는 셰이더 파일의 함수 이름.
- 셰이더 유형: 다른 언어와 마찬가지로 Vertex 셰이더, Pixel 셰이더 등을 로드하는지를 지정. enum타입이다.
셰이더 파일을 작성한다.
ScreenPass.usf
#include "Shared.ush"

void CustomScreenPassVS(
    in float4 InPosition : ATTRIBUTE0,
    in float2 InTexCoord : ATTRIBUTE1,
    out noperspective float4 OutUVAndScreenPos : TEXCOORD0,
    out float4 OutPosition : SV_POSITION)
{
    DrawRectangle(InPosition, InTexCoord, OutPosition, OutUVAndScreenPos);
}
9. Rescale Pass
코드 단순화를 위해, 메인 렌더링 패스 시작부분에 선택적 렝더링 패스를 추가하여 부분 영역 렌더링을 보상(?)한다.
기본적으로 코드는 영역과 동일한 크기의 버퍼에 부분 영역의 복사본을 만든다. 그렇게 하면, UV를 조정할 필요가 없어진다.
에디터에서는 시각적 결과와 성능이 동일하게 유지되므로, 렌더링 크기가 변경되지 않는 한 동일하다. 전체화면으로의 전환이나 뷰포트 크기를 조정하는 경우, 버퍼 재할당으로 약간의 버벅임이 발생할 수 있지만, 받아들일만 하다.
TODO_SHADER_RESCALE
#if WITH_EDITOR
    // Rescale shader
    class FLensFlareRescalePS : public FGlobalShader
    {
    public:
        DECLARE_GLOBAL_SHADER(FLensFlareRescalePS);
        SHADER_USE_PARAMETER_STRUCT(FLensFlareRescalePS, FGlobalShader);

        BEGIN_SHADER_PARAMETER_STRUCT(FParameters, )
            SHADER_PARAMETER_STRUCT_INCLUDE(FCustomLensFlarePassParameters, Pass)
            SHADER_PARAMETER_SAMPLER(SamplerState, InputSampler)
            SHADER_PARAMETER(FVector2f, InputViewportSize)
        END_SHADER_PARAMETER_STRUCT()

            static bool ShouldCompilePermutation(const FGlobalShaderPermutationParameters& Parameters)
        {
            return IsFeatureLevelSupported(Parameters.Platform, ERHIFeatureLevel::SM5);
        }
    };
    IMPLEMENT_GLOBAL_SHADER(FLensFlareRescalePS, "/CustomShaders/Rescale.usf", "RescalePS", SF_Pixel);
#endif
#if WITH_EDITOR는 프로젝트가 출시될때 컴파일시 제거되는 것을 의미한다.
이전 단계에서 보여준 것 처럼, FGlobalShader를 상속하는 새 클래스를 선언하여 시작한다.
SHADER_PARAMETER_STRUCT_INCLUDE: 처음에 만들었던 셰이더 구조체(FCustomLensFlarePassParameters)를 참조한다. 여기서는 버퍼 텍스처 입력을 추가하기 위해 사용.SHADER_PARAMETER_SAMPLER: 새 샘플러 파라미터를 선언.SHADER_PARAMETER: 주어진 유형의 매개변수를 선언하고 그 이름을 지정. HLSL에서 float2로 사용될 FVector2D를 사용.IMPLEMENT_GLOBAL_SHADER: 이번에는 픽셀 셰이더 이므로 ,SF_Pixel을 사용함을 알 수 있음.
Rescale.usf
#include "Shared.ush"

void RescalePS(
    in noperspective float4 UVAndScreenPos : TEXCOORD0,
    out float4 OutColor : SV_Target0 )
{
    float2 UV = UVAndScreenPos.xy * InputViewportSize;
    OutColor.rgb = Texture2DSample( InputTexture, InputSampler, UV ).rgb;
    OutColor.a = 0;
}
InputViewportSize의 도움으로 영역 크기를 기반으로 UV를 재조정하여 버퍼를 채운다.
이제 셰이더를 사용하는 코드를 추가해 보자.
TODO_RESCALE
#if WITH_EDITOR
    if( SceneColorViewport.Rect.Width()  != SceneColorViewport.Extent.X
    ||  SceneColorViewport.Rect.Height() != SceneColorViewport.Extent.Y )
    {
        const FString PassName("LensFlareRescale");

        // Build target buffer
        FRDGTextureDesc Desc = Inputs.HalfSceneColor.Texture->Desc;
        Desc.Reset();
        Desc.Extent     = SceneColorViewport.Rect.Size();
        Desc.Format     = PF_FloatRGB;
        Desc.ClearValue = FClearValueBindingTransparent;
        FRDGTextureRef RescaleTexture = GraphBuilder.CreateTexture(Desc, *PassName);

        // Setup shaders
        TShaderMapRef<FCustomScreenPassVS> VertexShader(View.ShaderMap);
        TShaderMapRef<FLensFlareRescalePS> PixelShader(View.ShaderMap);

        // Setup shader parameters
        FLensFlareRescalePS::FParameters* PassParameters = GraphBuilder.AllocParameters<FLensFlareRescalePS::FParameters>();
        PassParameters->Pass.InputTexture       = Inputs.HalfSceneColor.Texture;
        PassParameters->Pass.RenderTargets[0]   = FRenderTargetBinding(RescaleTexture, ERenderTargetLoadAction::ENoAction);
        PassParameters->InputSampler            = BilinearClampSampler;
        PassParameters->InputViewportSize = FVector2f(SceneColorViewportSize);

        // Render shader into buffer
        DrawShaderPass(
            GraphBuilder,
            PassName,
            PassParameters,
            VertexShader,
            PixelShader,
            ClearBlendState,
            SceneColorViewport.Rect
        );

        // Assign result before end of scope
        InputTexture = RescaleTexture;
    }
#endif
영역 크기(Rect)와 버퍼 크기(Extent)가 일치하지 않으면 크기를 다시 조정한다.
실제 렌더링 코드에는 세가지 주요 블록이 있다.
- Texture Creation: 우리는 실제로 텍스처/버퍼를 빌드하지 않고, RDG가 하도록 지시한다. RDG가 컴파일할 때, 새로운 버퍼를 생성하거나 재사용한다. GraphBuilder는 명령을 등록할 수 있는 RDG의 인스턴스이고, GraphBuilder.CreateTexture() 는 텍스처를 빌드 하게 해주는 함수다. 우리는 버퍼가 가질 속성의 Description을 설명해 주면 된다.
기존 버퍼의 Description을 재사용해 몇가지 설정을 재조정하는 것으로 성능을 향상시키는 것이 가능하다. 그것이 HalfSceneColor를 사용해 하는 코드다. 이것은 올바른 렌더링 플래그가 설정된 Description을 가지고 있기 때문에 수정할 필요가 없다. - Shader parameters: 다음은 버텍스와 픽셀 셰이더 인스턴스를 생성한다. 이것은 TShaderMapRef를 채우는 셰이더 클래스를 사용해서 이루어 진다.
그리고 실제 파라미터는 GraphBuilder를 사용해서 우리가 원하는 값을 할당할 수 있다. - Draw: 마지막으로 DrawShaderPass() 를 호출하여 GraphBuilder에 렌더링을 요청한다. 이 함수가 어떻게 작동하는지는 Utility fuction step에서 다시 확인해 볼 수 있다.
==FRenderTargetBinding==및 매개변수 할당에 대해 좀더 자세히 설명하자면 셰이더에서 보았듯이, 우리는 버퍼 입력 자체가 참조되는 매개변수 구조체를 참조한다. 이것은 또한 결과를 버퍼를 정의하고 어디에 그릴지를 정의하는 곳이다. 이것이 PassParameters->Pass.를 사용해 구조체 파라미터에 접근하는 이유다.
InputTexture는 우리가 읽기를 원하는 텍스처이고, RenderTargets[0] 버퍼는 우리가 쓰기를 원하는 버퍼다. FRenderTargetBinding은 어떤 버퍼에 쓰기를 할 것인지와 그 방법을 지정하는 특수한 객체로, ERenderTargetLoadAction을 사용하여 버퍼를 덮어쓸지 아니면 누적할지(additive blending)를 지정할 수 있다.
대부분의 경우에서 작성자는 ENoAction을 사용하는데, 우리는 RGB값만 렌더링하고 셰이더는 누적을 필요가 없기 때문이다. 그래서 Clear나 Load할 필요가 없다.
마지막으로 새로생성된 버퍼를 InputTexture에 변수에 할당하여 다음 패스에서 사용할 수 있도록 한다.
10. Downsample and Threshold Pass
다운 샘플링과 약간의 블러 패스는 에일리어싱을 해결해 준다.
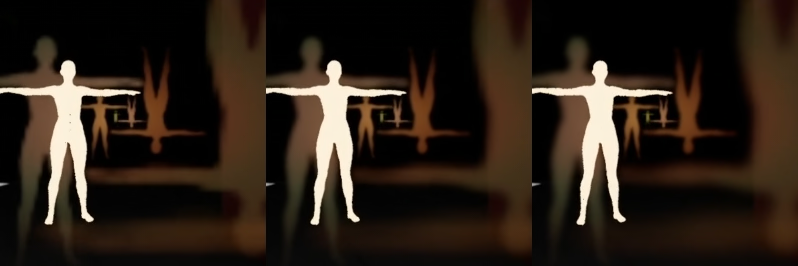
(No custom filtering vs Downsampling vs Downsampling+Blur, gif로 보면 확실히 티가난다.)
모든 후속 효과는 임계값 패스를 기반으로 구축된다. 따라서 이 임계값 패스를 잘 구축하는 것이 중요하다.
임계값 결과를 블러 처리하는 것은 좋은 효과를 볼 수 없다.
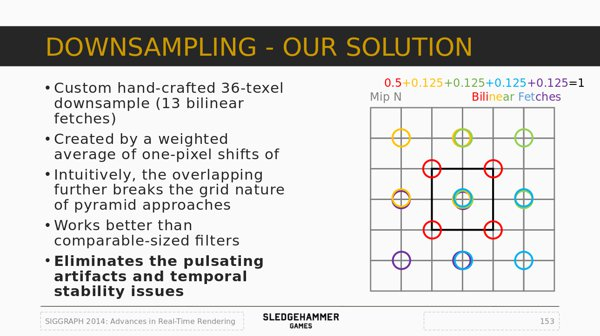
이전 Activision의 Call of Duty: Advanced Warfare에서 비슷한 문제를 겪은 블룸 생성에 대한 발표가 있었다.
그들은 블룸을 원래 입력 버퍼를 여러 번 축소하여 생성한다. 어느 순간 픽셀정보가 맞거나 틀린다. 그래서 카메라를 움직일 때 엘리어싱 문제로 깜박임이 발생한다. 그들의 해결책은 이동 중에도 최종 값을 안정화하기 위해 이웃 픽셀을 특정 가중치로 평균화하는 것이었다.
이제 위 방식을 기반으로 하는 다운샘플 패스를 만들어 보자
TODO_SHADER_DOWNSAMPLE
// Downsample shader
class FDownsamplePS : public FGlobalShader
{
public:
    DECLARE_GLOBAL_SHADER(FDownsamplePS);
    SHADER_USE_PARAMETER_STRUCT(FDownsamplePS, FGlobalShader);

    BEGIN_SHADER_PARAMETER_STRUCT(FParameters, )
        SHADER_PARAMETER_STRUCT_INCLUDE(FCustomLensFlarePassParameters, Pass)
        SHADER_PARAMETER_SAMPLER(SamplerState, InputSampler)
        SHADER_PARAMETER(FVector2f, InputSize)
        SHADER_PARAMETER(float, ThresholdLevel)
        SHADER_PARAMETER(float, ThresholdRange)
    END_SHADER_PARAMETER_STRUCT()

        static bool ShouldCompilePermutation(const FGlobalShaderPermutationParameters& Parameters)
    {
        return IsFeatureLevelSupported(Parameters.Platform, ERHIFeatureLevel::SM5);
    }
};
IMPLEMENT_GLOBAL_SHADER(FDownsamplePS, "/CustomShaders/DownsampleThreshold.usf", "DownsampleThresholdPS", SF_Pixel);
DownsampleThreshold.usf
#include "Shared.ush"

float2 InputSize;
float ThresholdLevel;
float ThresholdRange;

void DownsampleThresholdPS(
    in noperspective float4 UVAndScreenPos : TEXCOORD0,
    out float3 OutColor : SV_Target0 )
{
    float2 InPixelSize = 1.0f / InputSize;
    float2 UV = UVAndScreenPos.xy;
    float3 Color = float3( 0.0f, 0.0f ,0.0f );

    // 4 central samples
    float2 CenterUV_1 = UV + InPixelSize * float2(-1.0f, 1.0f);
    float2 CenterUV_2 = UV + InPixelSize * float2( 1.0f, 1.0f);
    float2 CenterUV_3 = UV + InPixelSize * float2(-1.0f,-1.0f);
    float2 CenterUV_4 = UV + InPixelSize * float2( 1.0f,-1.0f);

    Color += Texture2DSample(InputTexture, InputSampler, CenterUV_1 ).rgb;
    Color += Texture2DSample(InputTexture, InputSampler, CenterUV_2 ).rgb;
    Color += Texture2DSample(InputTexture, InputSampler, CenterUV_3 ).rgb;
    Color += Texture2DSample(InputTexture, InputSampler, CenterUV_4 ).rgb;

    OutColor.rgb = (Color / 4.0f) * 0.5f;

    // 3 row samples
    Color = float3( 0.0f, 0.0f ,0.0f );

    float2 RowUV_1 = UV + InPixelSize * float2(-2.0f, 2.0f);
    float2 RowUV_2 = UV + InPixelSize * float2( 0.0f, 2.0f);
    float2 RowUV_3 = UV + InPixelSize * float2( 2.0f, 2.0f);

    float2 RowUV_4 = UV + InPixelSize * float2(-2.0f, 0.0f);
    float2 RowUV_5 = UV + InPixelSize * float2( 0.0f, 0.0f);
    float2 RowUV_6 = UV + InPixelSize * float2( 2.0f, 0.0f);

    float2 RowUV_7 = UV + InPixelSize * float2(-2.0f,-2.0f);
    float2 RowUV_8 = UV + InPixelSize * float2( 0.0f,-2.0f);
    float2 RowUV_9 = UV + InPixelSize * float2( 2.0f,-2.0f);

    Color += Texture2DSample(InputTexture, InputSampler, RowUV_1 ).rgb;
    Color += Texture2DSample(InputTexture, InputSampler, RowUV_2 ).rgb;
    Color += Texture2DSample(InputTexture, InputSampler, RowUV_3 ).rgb;

    Color += Texture2DSample(InputTexture, InputSampler, RowUV_4 ).rgb;
    Color += Texture2DSample(InputTexture, InputSampler, RowUV_5 ).rgb;
    Color += Texture2DSample(InputTexture, InputSampler, RowUV_6 ).rgb;

    Color += Texture2DSample(InputTexture, InputSampler, RowUV_7 ).rgb;
    Color += Texture2DSample(InputTexture, InputSampler, RowUV_8 ).rgb;
    Color += Texture2DSample(InputTexture, InputSampler, RowUV_9 ).rgb;

    OutColor.rgb += (Color / 9.0f) * 0.5f;

    // Threshold
    float Luminance = dot(OutColor.rgb, 1);
    float ThresholdScale = saturate( (Luminance - ThresholdLevel) / ThresholdRange );

    OutColor.rgb *= ThresholdScale;
}
코드에서 볼 수 있듯이, 먼저 13개의 샘플을 구한뒤 fade in/out의 레벨과 범위를 지정하여 작동하는 임계값(Threshold)을 만든다. 임계값은 Dot product를 통해 계산된 픽셀 밝기를 기반으로 적용된다.
TODO_THRESHOLD
	 RDG_EVENT_SCOPE(GraphBuilder, "ThresholdPass");

    FRDGTextureRef OutputTexture = nullptr;

    FIntRect Viewport = View.ViewRect;
    FIntRect Viewport2 = FIntRect( 0, 0,
        View.ViewRect.Width() / 2,
        View.ViewRect.Height() / 2
    );
    FIntRect Viewport4 = FIntRect( 0, 0,
        View.ViewRect.Width() / 4,
        View.ViewRect.Height() / 4
    );
이 코드는 RenderThreshold()함수에 있기 때문에 프로파일링을 위한 dedicated event를 추가할 수 있다. 그리고 OutputTexture를 준비하고, FIntRect를 통해 빌드하고 렌더링할 버퍼의 사이즈를 준비한다.
{
    const FString PassName("LensFlareDownsample");

    // Build texture
    FRDGTextureDesc Description = InputTexture->Desc;
    Description.Reset();
    Description.Extent = Viewport4.Size();
    Description.Format = PF_FloatRGB;
    Description.ClearValue = FClearValueBindingBlack;
    FRDGTextureRef Texture = GraphBuilder.CreateTexture(Description, *PassName);

    // Render shader
    TShaderMapRef<FCustomScreenPassVS> VertexShader(View.ShaderMap);
    TShaderMapRef<FDownsamplePS> PixelShader(View.ShaderMap);

    FDownsamplePS::FParameters* PassParameters = GraphBuilder.AllocParameters<FDownsamplePS::FParameters>();
    PassParameters->Pass.InputTexture = InputTexture;
    PassParameters->Pass.RenderTargets[0] = FRenderTargetBinding(Texture, ERenderTargetLoadAction::ENoAction);
    PassParameters->InputSampler = BilinearClampSampler;
    PassParameters->InputSize = FVector2f(Viewport2.Size());
    PassParameters->ThresholdLevel = PostProcessAsset->ThresholdLevel;
    PassParameters->ThresholdRange = PostProcessAsset->ThresholdRange;

    DrawShaderPass(
        GraphBuilder,
        PassName,
        PassParameters,
        VertexShader,
        PixelShader,
        ClearBlendState,
        Viewport4
    );

    OutputTexture = Texture;
}
Rescale Pass와 비슷한데, 우리고 보게 될 다른 렌더링 패스도 비슷할 것이다. 여기에는 주목할만한 새로운 것은 거의 없다.
InputSize는 입력 버퍼의 해상도다. (Scene Color의 half)DrawShaderPass()와Texture해상도는Viewpart4로 설정되는데 우리는 다운샘플링을 하기 때문에 이전 해상도를 2로 나눠준 값을 사용할 필요가 있다.Texture는OutputTexture로 할당된다.
파라미터 값이PostProcessAsset값에서 설정됨을 알 수 있다.
이제 블러를 추가해 준다.
TODO_THRESHOLD_BLUR
    {
        OutputTexture = RenderBlur(
            GraphBuilder,
            OutputTexture,
            View,
            Viewport2,
            1
        );
    }

    return OutputTexture;

} // End of RenderThreshold()
자세한 함수는 다음 섹션에서 다룬다.
여기서 주목할 점은 ==1==이 함수의 파라미터로 들어간다는 점인데, 이것은 한번의 블러만 수행됨을 의미한다. 추가적인 패스는 비용이 들기도 하고 이미 사용자 정의 다운샘플 패스를 사용 했기 때문에, 추가적인 블러는 필요없다.
11. Blur Function
작성자는 여러가지 블러 방법을 시도해 보았다.
- Box blur: 너무 각져 퀄리티면에서 만족하지 못함.
- Circular blur: 간단한 보케효과에는 좋지만, 일반적인 블러링에는 이상한 패턴이다.
- Gaussian blur": 초기버전은 Mipmap을 계산해야 했기 때문에 꽤 많은 추가적인 패스가 필요했었다.(또한 품질 / 필터링 문제가 있었는데, 잘못 작성되서 그럴 수도 있음)
최종적으론, Dual Kawase를 사용했는데, 기존 Kawase 방식의 향상된 버전으로 빠른 컴퓨팅속도로 가우시안 블러를 모방하는 방식이다. 이름은 GDC에서 발표를 했었던 Masaki Kawase의 이름에서 따왔다.
블러의 방법은 간단히 말하자면 각각의 픽셀이 이웃을 샘플링 하는 패스를 여러번 하는 것이다. 따라서 블러의 강도는 패스가 수행되는 수에 따라 결정된다.
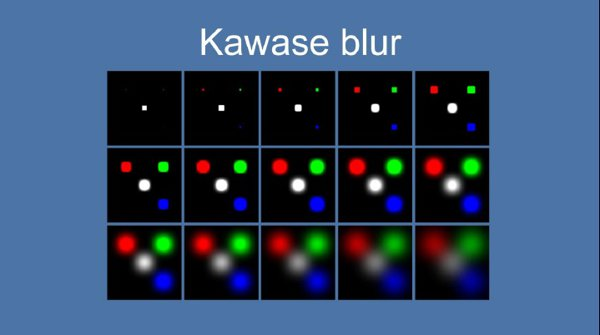
듀얼 버전은 GPU의 이중선형 샘플링의 이점을 활용한다. 같은 사이즈의 버퍼를 사용하는 게 아닌, 각각의 패스는 이전 결과의 다운샘플링이다.그리고 중간에 업샘플링 패스를 통과한다. 다운과 업 과정은 이중선형보간의 이점을 가져가게 된다.
이것이 의미하는 것은 필요한 총 패스 수를 줄이고 더 낮은 해상도를 처리함으로 필레이트를 향상시킬 수 있다.
이 블러 방식은 몇번 사용하게 될 예정이라, 따로 `RenderBlur()함수를 만들어서 구현한다.
TODO_BLUR
FRDGTextureRef UPostProcessSubsystem::RenderBlur(
        FRDGBuilder& GraphBuilder,
        FRDGTextureRef InputTexture,
        const FViewInfo& View,
        const FIntRect& Viewport,
        int BlurSteps
    )
{
    // Shader setup
    TShaderMapRef<FCustomScreenPassVS>  VertexShader(View.ShaderMap);
    TShaderMapRef<FKawaseBlurDownPS>    PixelShaderDown(View.ShaderMap);
    TShaderMapRef<FKawaseBlurUpPS>      PixelShaderUp(View.ShaderMap);

    // Data setup
    FRDGTextureRef PreviousBuffer = InputTexture;
    const FRDGTextureDesc& InputDescription = InputTexture->Desc;

    const FString PassDownName  = TEXT("Down");
    const FString PassUpName    = TEXT("Up");
    const int32 ArraySize = BlurSteps * 2;

    // Viewport resolutions
    // Could have been a bit more clever and avoid duplicate
    // sizes for upscale passes but heh... it works.
    int32 Divider = 2;
    TArray<FIntRect> Viewports;
    for( int32 i = 0; i < ArraySize; i++ )
    {
        FIntRect NewRect = FIntRect(
            0,
            0,
            Viewport.Width() / Divider,
            Viewport.Height() / Divider
        );

        Viewports.Add( NewRect );

        if( i < (BlurSteps - 1) )
        {
            Divider *= 2;
        }
        else
        {
            Divider /= 2;
        }
    }

	[...]
블러 함수는 여러 준비 작업이 필요한데, 입력 버퍼가 다운샘플링 및 업샘플링 되어야 하므로 필요한 버퍼 크기가 다르다. 여기서의 루프는 패스 수와 인수에 기반해 크기와 해상도를 만들어 낸다.
BlurSteps는 얼마나 다운 및 업 샘플 패스를 할지를 정하는 입력 인수다. 우리는 위에서 1을 입력인수로 주었기 때문에 한번 다운 업 패스를 지나게 될 것 이다.(그러므로 총 2번의 패스)
이어서 렌더링 루프문이다.
	[...]
	    // Render
    for (int32 i = 0; i < ArraySize; i++)
    {
        // Build texture
        FRDGTextureDesc BlurDesc = InputDescription;
        BlurDesc.Reset();
        BlurDesc.Extent = Viewports[i].Size();
        BlurDesc.Format = PF_FloatRGB;
        BlurDesc.NumMips = 1;
        BlurDesc.ClearValue = FClearValueBindingTransparent;

        FVector2f ViewportResolution = FVector2f(
            Viewports[i].Width(),
            Viewports[i].Height()
        );

        const FString PassName =
            FString("KawaseBlur")
            + FString::Printf(TEXT("_%i_"), i)
            + ((i < BlurSteps) ? PassDownName : PassUpName)
            + FString::Printf(TEXT("_%ix%i"), Viewports[i].Width(), Viewports[i].Height());

        FRDGTextureRef Buffer = GraphBuilder.CreateTexture(BlurDesc, *PassName);

        // Render shader
        if (i < BlurSteps)
        {
            FKawaseBlurDownPS::FParameters* PassDownParameters = GraphBuilder.AllocParameters<FKawaseBlurDownPS::FParameters>();
            PassDownParameters->Pass.InputTexture = PreviousBuffer;
            PassDownParameters->Pass.RenderTargets[0] = FRenderTargetBinding(Buffer, ERenderTargetLoadAction::ENoAction);
            PassDownParameters->InputSampler = BilinearClampSampler;
            PassDownParameters->BufferSize = ViewportResolution;

            DrawShaderPass(
                GraphBuilder,
                PassName,
                PassDownParameters,
                VertexShader,
                PixelShaderDown,
                ClearBlendState,
                Viewports[i]
            );
        }
        else
        {
            FKawaseBlurUpPS::FParameters* PassUpParameters = GraphBuilder.AllocParameters<FKawaseBlurUpPS::FParameters>();
            PassUpParameters->Pass.InputTexture = PreviousBuffer;
            PassUpParameters->Pass.RenderTargets[0] = FRenderTargetBinding(Buffer, ERenderTargetLoadAction::ENoAction);
            PassUpParameters->InputSampler = BilinearClampSampler;
            PassUpParameters->BufferSize = ViewportResolution;

            DrawShaderPass(
                GraphBuilder,
                PassName,
                PassUpParameters,
                VertexShader,
                PixelShaderUp,
                ClearBlendState,
                Viewports[i]
            );
        }

        PreviousBuffer = Buffer;
    }

    return PreviousBuffer;
}
RDG 셰이더 파라미터를 재사용하는 것을 허용하지 않기 때문에 각각의 패스에서 AllocParameters()를 통해 매번 새로운 파라미터를 할당해 주어야 한다.
이제 셰이더를 셋업해보자.
TODO_SHADER_KAWASE
 // Blur shader (use Dual Kawase method)
 class FKawaseBlurDownPS : public FGlobalShader
 {
 public:
     DECLARE_GLOBAL_SHADER(FKawaseBlurDownPS);
     SHADER_USE_PARAMETER_STRUCT(FKawaseBlurDownPS, FGlobalShader);

     BEGIN_SHADER_PARAMETER_STRUCT(FParameters, )
         SHADER_PARAMETER_STRUCT_INCLUDE(FCustomLensFlarePassParameters, Pass)
         SHADER_PARAMETER_SAMPLER(SamplerState, InputSampler)
         SHADER_PARAMETER(FVector2f, BufferSize)
     END_SHADER_PARAMETER_STRUCT()

         static bool ShouldCompilePermutation(const FGlobalShaderPermutationParameters& Parameters)
     {
         return IsFeatureLevelSupported(Parameters.Platform, ERHIFeatureLevel::SM5);
     }
 };

 class FKawaseBlurUpPS : public FGlobalShader
 {
 public:
     DECLARE_GLOBAL_SHADER(FKawaseBlurUpPS);
     SHADER_USE_PARAMETER_STRUCT(FKawaseBlurUpPS, FGlobalShader);

     BEGIN_SHADER_PARAMETER_STRUCT(FParameters, )
         SHADER_PARAMETER_STRUCT_INCLUDE(FCustomLensFlarePassParameters, Pass)
         SHADER_PARAMETER_SAMPLER(SamplerState, InputSampler)
         SHADER_PARAMETER(FVector2f, BufferSize)
         END_SHADER_PARAMETER_STRUCT()

         static bool ShouldCompilePermutation(const FGlobalShaderPermutationParameters& Parameters)
     {
         return IsFeatureLevelSupported(Parameters.Platform, ERHIFeatureLevel::SM5);
     }
 };
 IMPLEMENT_GLOBAL_SHADER(FKawaseBlurDownPS, "/CustomShaders/DualKawaseBlur.usf", "KawaseBlurDownsamplePS", SF_Pixel);
 IMPLEMENT_GLOBAL_SHADER(FKawaseBlurUpPS, "/CustomShaders/DualKawaseBlur.usf", "KawaseBlurUpsamplePS", SF_Pixel);
DualKawaseBlur.usf
#include "Shared.ush"

float2 BufferSize;

void KawaseBlurDownsamplePS(
    in noperspective float4 UVAndScreenPos : TEXCOORD0,
    out float4 OutColor : SV_Target0 )
{
    float2 UV = UVAndScreenPos.xy;
    float2 HalfPixel = (1.0f / BufferSize) * 0.5f;

    float2 DirDiag1 = float2( -HalfPixel.x,  HalfPixel.y ); // Top left
    float2 DirDiag2 = float2(  HalfPixel.x,  HalfPixel.y ); // Top right
    float2 DirDiag3 = float2(  HalfPixel.x, -HalfPixel.y ); // Bottom right
    float2 DirDiag4 = float2( -HalfPixel.x, -HalfPixel.y ); // Bottom left

    float3 Color = Texture2DSample(InputTexture, InputSampler, UV ).rgb * 4.0f;
    Color += Texture2DSample(InputTexture, InputSampler, UV + DirDiag1 ).rgb;
    Color += Texture2DSample(InputTexture, InputSampler, UV + DirDiag2 ).rgb;
    Color += Texture2DSample(InputTexture, InputSampler, UV + DirDiag3 ).rgb;
    Color += Texture2DSample(InputTexture, InputSampler, UV + DirDiag4 ).rgb;

    OutColor.rgb = Color / 8.0f;
    OutColor.a = 0.0f;
}

void KawaseBlurUpsamplePS(
    in noperspective float4 UVAndScreenPos : TEXCOORD0,
    out float4 OutColor : SV_Target0 )
{
    float2 UV = UVAndScreenPos.xy;
    float2 HalfPixel = (1.0f / BufferSize) * 0.5f;

    float2 DirDiag1 = float2( -HalfPixel.x,  HalfPixel.y ); // Top left
    float2 DirDiag2 = float2(  HalfPixel.x,  HalfPixel.y ); // Top right
    float2 DirDiag3 = float2(  HalfPixel.x, -HalfPixel.y ); // Bottom right
    float2 DirDiag4 = float2( -HalfPixel.x, -HalfPixel.y ); // Bottom left
    float2 DirAxis1 = float2( -HalfPixel.x,  0.0f );        // Left
    float2 DirAxis2 = float2(  HalfPixel.x,  0.0f );        // Right
    float2 DirAxis3 = float2( 0.0f,  HalfPixel.y );         // Top
    float2 DirAxis4 = float2( 0.0f, -HalfPixel.y );         // Bottom

    float3 Color = float3( 0.0f, 0.0f, 0.0f );

    Color += Texture2DSample(InputTexture, InputSampler, UV + DirDiag1 ).rgb;
    Color += Texture2DSample(InputTexture, InputSampler, UV + DirDiag2 ).rgb;
    Color += Texture2DSample(InputTexture, InputSampler, UV + DirDiag3 ).rgb;
    Color += Texture2DSample(InputTexture, InputSampler, UV + DirDiag4 ).rgb;

    Color += Texture2DSample(InputTexture, InputSampler, UV + DirAxis1 ).rgb * 2.0f;
    Color += Texture2DSample(InputTexture, InputSampler, UV + DirAxis2 ).rgb * 2.0f;
    Color += Texture2DSample(InputTexture, InputSampler, UV + DirAxis3 ).rgb * 2.0f;
    Color += Texture2DSample(InputTexture, InputSampler, UV + DirAxis4 ).rgb * 2.0f;

    OutColor.rgb = Color / 12.0f;
    OutColor.a = 0.0f;
}
다운 샘플 함수는 네방향의 네 샘플을 사용한다. 업샘플 함수는 여덟개의 샘플을 사용한다.
주의할 점은 해상도에 따라 동일한 수준의 블러에 도달하기 위해 패스의 수가 다를수 있다. 이 글은 1080p를 기준으로 하지만 더 높은 해상도(ex.4K)에서는 더 많은 패스 수가 필요할 수 있다.
12. Ghost Pass
- Chromatic shift: Threshold pass의 결과물에 약간의 chromatic aberration을 적용한다.
- Ghost loop: 이전 결과를 다양한 비율로 여러번 그려 고스트 효과를 만들어 낸다.
- Halo: Threshold pass의 결과를 읽어 변형시켜 Halo 효과를 만들어 낸다.
이상이RenderFlare()에서 수행될 내용이다.
Chroma Shift Subpass
TODO_SHADER_CHROMA
    // Chromatic shift shader
    class FLensFlareChromaPS : public FGlobalShader
    {
        public:
            DECLARE_GLOBAL_SHADER(FLensFlareChromaPS);
            SHADER_USE_PARAMETER_STRUCT(FLensFlareChromaPS, FGlobalShader);

            BEGIN_SHADER_PARAMETER_STRUCT(FParameters, )
                SHADER_PARAMETER_STRUCT_INCLUDE(FCustomLensFlarePassParameters, Pass)
                SHADER_PARAMETER_SAMPLER(SamplerState, InputSampler)
                SHADER_PARAMETER(float, ChromaShift)
            END_SHADER_PARAMETER_STRUCT()

            static bool ShouldCompilePermutation(const FGlobalShaderPermutationParameters& Parameters)
            {
                return IsFeatureLevelSupported(Parameters.Platform, ERHIFeatureLevel::SM5);
            }
    };
    IMPLEMENT_GLOBAL_SHADER(FLensFlareChromaPS, "/CustomShaders/Chroma.usf", "ChromaPS", SF_Pixel);
Chroma.usf
#include "Shared.ush"

float ChromaShift;

void ChromaPS(
    in noperspective float4 UVAndScreenPos : TEXCOORD0,
    out float3 OutColor : SV_Target0)
{
    float2 UV = UVAndScreenPos.xy;
    const float2 CenterPoint = float2( 0.5f, 0.5f );
    float2 UVr = (UV - CenterPoint) * (1.0f + ChromaShift) + CenterPoint;
    float2 UVb = (UV - CenterPoint) * (1.0f - ChromaShift) + CenterPoint;

    OutColor.r = Texture2DSample(InputTexture, InputSampler, UVr ).r;
    OutColor.g = Texture2DSample(InputTexture, InputSampler, UV  ).g;
    OutColor.b = Texture2DSample(InputTexture, InputSampler, UVb ).b;
}
TODO_FLARE_CHROMA
	RDG_EVENT_SCOPE(GraphBuilder, "FlarePass");

    FRDGTextureRef OutputTexture = nullptr;

    FIntRect Viewport = View.ViewRect;
    FIntRect Viewport2 = FIntRect( 0, 0,
        View.ViewRect.Width() / 2,
        View.ViewRect.Height() / 2
    );
    FIntRect Viewport4 = FIntRect( 0, 0,
        View.ViewRect.Width() / 4,
        View.ViewRect.Height() / 4
    );
Threshold 함수에서 처럼, 렌더링전에 약간의 셋업을 해준다. 그리고 chromatic shift pass를 수행한다.
	FRDGTextureRef ChromaTexture = nullptr;

    {
        const FString PassName("LensFlareChromaGhost");

        // Build buffer
        FRDGTextureDesc Description = InputTexture->Desc;
        Description.Reset();
        Description.Extent  = Viewport2.Size();
        Description.Format  = PF_FloatRGB;
        Description.ClearValue = FClearValueBindingBlack;
        ChromaTexture = GraphBuilder.CreateTexture(Description, *PassName);

        // Shader parameters
        TShaderMapRef<FCustomScreenPassVS> VertexShader(View.ShaderMap);
        TShaderMapRef<FLensFlareChromaPS> PixelShader(View.ShaderMap);

        FLensFlareChromaPS::FParameters* PassParameters = GraphBuilder.AllocParameters<FLensFlareChromaPS::FParameters>();
        PassParameters->Pass.InputTexture       = InputTexture;
        PassParameters->Pass.RenderTargets[0]   = FRenderTargetBinding(ChromaTexture, ERenderTargetLoadAction::ENoAction);
        PassParameters->InputSampler            = BilinearBorderSampler;
        PassParameters->ChromaShift             = PostProcessAsset->GhostChromaShift;

        // Render
        DrawShaderPass(
            GraphBuilder,
            PassName,
            PassParameters,
            VertexShader,
            PixelShader,
            ClearBlendState,
            Viewport2
        );
    }
주의할 점은 ChromaTexture변수가 범위 밖에 위치한다는 점이다. 이번에는 렌더를 연결하지 않기 때문에 이후에 연결 가능하게 추가적인 버퍼가 필요하다.
Ghost Subpass
화면의 특정 위치에서 Ghost를 숨기기 위해 몇가지 사용자 정의 마스크를 사용한다는 점에 주의하자.
TODO_SHADER_GHOSTS
    // Ghost shader
    class FLensFlareGhostsPS : public FGlobalShader
    {
        public:
            DECLARE_GLOBAL_SHADER(FLensFlareGhostsPS);
            SHADER_USE_PARAMETER_STRUCT(FLensFlareGhostsPS, FGlobalShader);

            BEGIN_SHADER_PARAMETER_STRUCT(FParameters, )
                SHADER_PARAMETER_STRUCT_INCLUDE(FCustomLensFlarePassParameters, Pass)
                SHADER_PARAMETER_SAMPLER(SamplerState, InputSampler)
                SHADER_PARAMETER_ARRAY(FVector4f, GhostColors, [8])
                SHADER_PARAMETER_SCALAR_ARRAY(float, GhostScales, [8])
                SHADER_PARAMETER(float, Intensity)
            END_SHADER_PARAMETER_STRUCT()

            static bool ShouldCompilePermutation(const FGlobalShaderPermutationParameters& Parameters)
            {
                return IsFeatureLevelSupported(Parameters.Platform, ERHIFeatureLevel::SM5);
            }
    };
    IMPLEMENT_GLOBAL_SHADER(FLensFlareGhostsPS, "/CustomShaders/Ghosts.usf", "GhostsPS", SF_Pixel);
SHADER_PARAMETER_ARRAY라는 새로운 타입의 파라미터가 보이는데, 이 매크로는 셰이더에 사용되는 배열을 정의하는 매크로다. 매크로의 인자는 데이터타입, 변수명, 배열의 크기 세개를 받는다.
지금의 경우에는 그릴 고스트의 숫자는 고정되어 있다.(Data Asset에서)
Ghosts.usf
#include "Shared.ush"

float4 GhostColors[8];
DECLARE_SCALAR_ARRAY(float, GhostScales, 8);
float Intensity;

void GhostsPS(
    in noperspective float4 UVAndScreenPos : TEXCOORD0,
    out float4 OutColor : SV_Target0)
{
    float2 UV = UVAndScreenPos.xy;
    float3 Color = float3(0.0f, 0.0f, 0.0f);

    for (int i = 0; i < 8; i++)
    {
        // Skip ghost if size is basically 0
        if (abs(GhostColors[i].a * GET_SCALAR_ARRAY_ELEMENT(GhostScales, i)) > 0.0001f)
        {
            float2 NewUV = (UV - 0.5f) * GET_SCALAR_ARRAY_ELEMENT(GhostScales, i);

            // Local mask
            float DistanceMask = 1.0f - distance(float2(0.0f, 0.0f), NewUV);
            float Mask = smoothstep(0.5f, 0.9f, DistanceMask);
            float Mask2 = smoothstep(0.75f, 1.0f, DistanceMask) * 0.95f + 0.05f;

            Color += Texture2DSample(InputTexture, InputSampler, NewUV + 0.5f).rgb
                    * GhostColors[i].rgb
                    * GhostColors[i].a
                    * Mask * Mask2;
        }
    }

    float2 ScreenPos = UVAndScreenPos.zw;
    float ScreenborderMask = DiscMask(ScreenPos * 0.9f);

    OutColor.rgb = Color * ScreenborderMask * Intensity;

    OutColor.a = 0;
}
아래는 마스킹 작업이 하는 일에 대한 비교다. 로컬 마스크는 유령의 가운데를 밝게 만들지만 바깥쪽 테두리는 희미하게 만든다. 이것은 조명원을 직접 보면 밝게 느껴지고 멀리 보면 덜 하는 아트적 선택이다. 그런 다음 화면 테두리 마스크는 효과를 깨끗하게 만들어 보이지 않도록 화면 테두리에 심각한 이음선이 없도록 한다.
기존 작성자와 다른 점으로, 엔전의 버전이 업데이트 되면서 생긴 문제인진 모르겠지만 float형 배열을 선언할때는 DECLARE_SCALAR_ARRAY()를 사용하고, 사용할 때에도 GET_SCALAR_ARRAY_ELEMENT() 를 사용해 주어야 한다. C++코드에서 바인딩할 구조체를 만들대도 마찬가지로 SHADER_PARAMETER_SCALAR_ARRAY()를 사용한 모습을 볼 수 있다. 후에 나올 C++렌더링 코드에서도 GET_SCALAR_ARRAY_ELEMENT()를 사용해서 배열 요소에 접근하는 것을 확인할 수 있다.
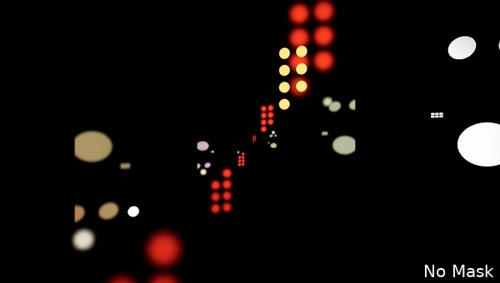
(No Masking at all)
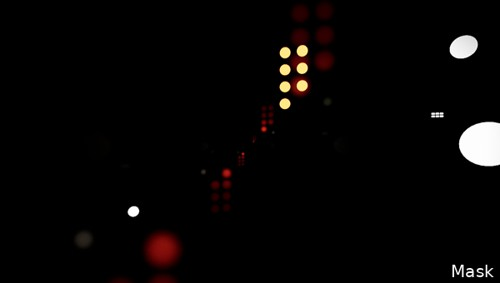
(Local Masking, aplplied in the loop on each ghost)
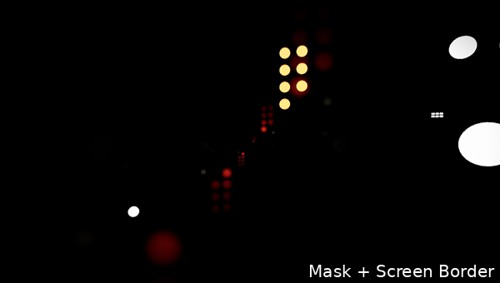
(Masking at the borders of the screen)
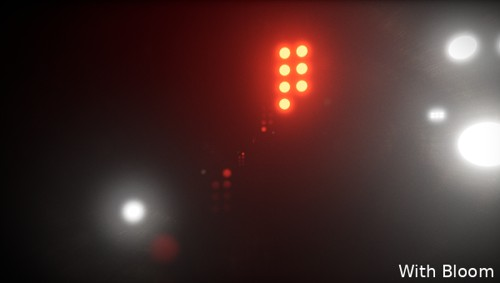
(Combined with bloom)
TODO_FLARE_GHOSTS
    {
        const FString PassName("LensFlareGhosts");

        // Build buffer
        FRDGTextureDesc Description = InputTexture->Desc;
        Description.Reset();
        Description.Extent  = Viewport2.Size();
        Description.Format  = PF_FloatRGB;
        Description.ClearValue = FClearValueBindingTransparent;
        FRDGTextureRef Texture = GraphBuilder.CreateTexture(Description, *PassName);

        // Shader parameters
        TShaderMapRef<FCustomScreenPassVS> VertexShader(View.ShaderMap);
        TShaderMapRef<FLensFlareGhostsPS> PixelShader(View.ShaderMap);

        FLensFlareGhostsPS::FParameters* PassParameters = GraphBuilder.AllocParameters<FLensFlareGhostsPS::FParameters>();
        PassParameters->Pass.InputTexture       = ChromaTexture;
        PassParameters->Pass.RenderTargets[0]   = FRenderTargetBinding(Texture, ERenderTargetLoadAction::ENoAction);
        PassParameters->InputSampler            = BilinearBorderSampler;
        PassParameters->Intensity               = PostProcessAsset->GhostIntensity;

        PassParameters->GhostColors[0] = PostProcessAsset->Ghost1.Color;
        PassParameters->GhostColors[1] = PostProcessAsset->Ghost2.Color;
        PassParameters->GhostColors[2] = PostProcessAsset->Ghost3.Color;
        PassParameters->GhostColors[3] = PostProcessAsset->Ghost4.Color;
        PassParameters->GhostColors[4] = PostProcessAsset->Ghost5.Color;
        PassParameters->GhostColors[5] = PostProcessAsset->Ghost6.Color;
        PassParameters->GhostColors[6] = PostProcessAsset->Ghost7.Color;
        PassParameters->GhostColors[7] = PostProcessAsset->Ghost8.Color;

        GET_SCALAR_ARRAY_ELEMENT(PassParameters->GhostScales, 0) = PostProcessAsset->Ghost1.Scale;
GET_SCALAR_ARRAY_ELEMENT(PassParameters->GhostScales, 1) = PostProcessAsset->Ghost2.Scale;
GET_SCALAR_ARRAY_ELEMENT(PassParameters->GhostScales, 2) = PostProcessAsset->Ghost3.Scale;
GET_SCALAR_ARRAY_ELEMENT(PassParameters->GhostScales, 3) = PostProcessAsset->Ghost4.Scale;
GET_SCALAR_ARRAY_ELEMENT(PassParameters->GhostScales, 4) = PostProcessAsset->Ghost5.Scale;
GET_SCALAR_ARRAY_ELEMENT(PassParameters->GhostScales, 5) = PostProcessAsset->Ghost6.Scale;
GET_SCALAR_ARRAY_ELEMENT(PassParameters->GhostScales, 6) = PostProcessAsset->Ghost7.Scale;
GET_SCALAR_ARRAY_ELEMENT(PassParameters->GhostScales, 7) = PostProcessAsset->Ghost8.Scale;

        // Render
        DrawShaderPass(
            GraphBuilder,
            PassName,
            PassParameters,
            VertexShader,
            PixelShader,
            ClearBlendState,
            Viewport2
        );

        OutputTexture = Texture;
    }
특별한점이라곤 없지만 데이터 에셋이 배열을 사용하지 않기 때문에 루프문 없이 파라미터를 할당해 주고 있다. 그 이유는 UE 데이터 에셋의 버그가 있어서 라는데 자세한 내용은 이곳을 참고.
Halo Subpass
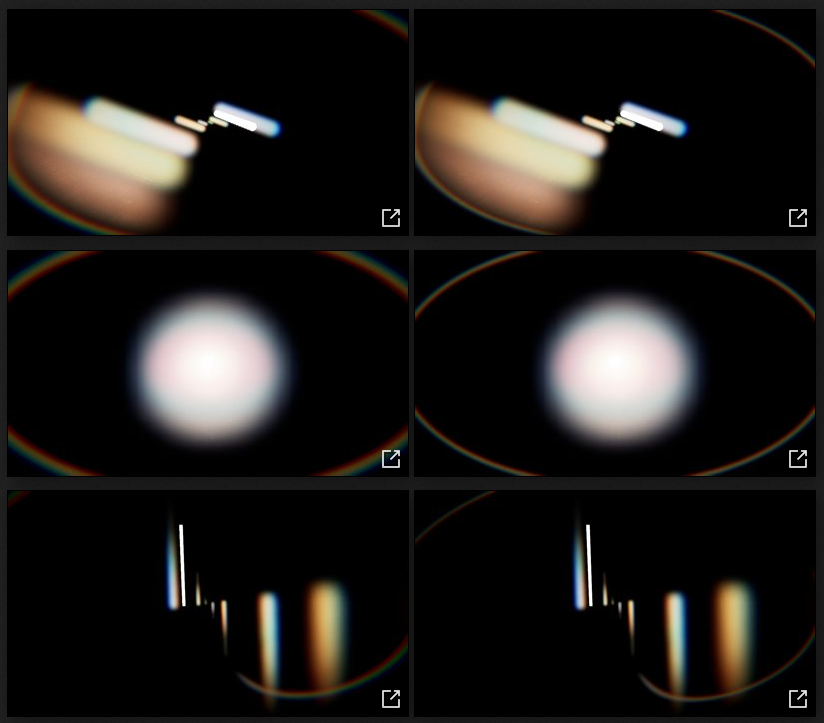
헤일로 이펙트는 John Chapman의 아티클을 베이스로 만들어 졌다.
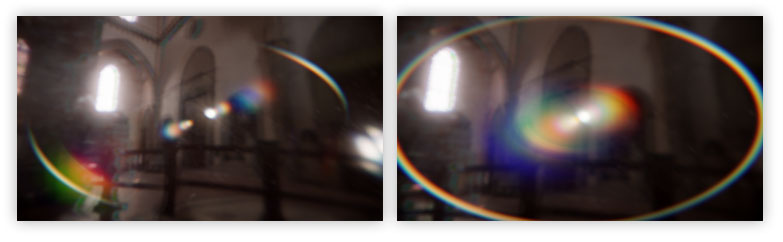
대략적인 아이디어는 UV좌표를 왜곡하는 방향 벡터를 만드는 것이다. 이것은 화면 중앙에 있는 밝은 빛을 화면 가장자리로 밀어준다.
작성자는 UV를 어떤 것이 더 멀리 떨어지도록 왜곡하는 fish eye 이펙트로 조정했다. 이는 대부분의 경우 매우 얇은 헤일로를 얻고 이전에 추가한 고스트와의 중첩을 피하고자 했기 때문이다.
일반 헤일로(왼쪽)와 피쉬아이 헤일로(오른쪽)
TODO_SHADER_HALO
	class FLensFlareHaloPS : public FGlobalShader
    {
        public:
            DECLARE_GLOBAL_SHADER(FLensFlareHaloPS);
            SHADER_USE_PARAMETER_STRUCT(FLensFlareHaloPS, FGlobalShader);

            BEGIN_SHADER_PARAMETER_STRUCT(FParameters, )
                SHADER_PARAMETER_STRUCT_INCLUDE(FCustomLensFlarePassParameters, Pass)
                SHADER_PARAMETER_SAMPLER(SamplerState, InputSampler)
                SHADER_PARAMETER(float, Width)
                SHADER_PARAMETER(float, Mask)
                SHADER_PARAMETER(float, Compression)
                SHADER_PARAMETER(float, Intensity)
                SHADER_PARAMETER(float, ChromaShift)
            END_SHADER_PARAMETER_STRUCT()

            static bool ShouldCompilePermutation(const FGlobalShaderPermutationParameters& Parameters)
            {
                return IsFeatureLevelSupported(Parameters.Platform, ERHIFeatureLevel::SM5);
            }
    };
    IMPLEMENT_GLOBAL_SHADER(FLensFlareHaloPS, "/CustomShaders/Halo.usf", "HaloPS", SF_Pixel);
여기서 주의할 점은 float 매개변수가 있다는 것인데, FVector로 그룹화 하는 것이 좋아보일 수 있지만 RDG가 이러한 종류의 매개변수 그룹화/배치를 자동으로 수행하기 때문에 별도로 합칠 필요가 없다.
Halo.usf
#include "Shared.ush"

float2 FisheyeUV( float2 UV, float Compression, float Zoom )
{
    float2 NegPosUV = (2.0f * UV - 1.0f);

    float Scale = Compression * atan( 1.0f / Compression );
    float RadiusDistance = length(NegPosUV) * Scale;
    float RadiusDirection = Compression * tan( RadiusDistance / Compression ) * Zoom;
    float Phi = atan2( NegPosUV.y, NegPosUV.x );

    float2 NewUV = float2(  RadiusDirection * cos(Phi) + 1.0,
                            RadiusDirection * sin(Phi) + 1.0 );
    NewUV = NewUV / 2.0;

    return NewUV;
}

[...]
피쉬아이 함수는 UV를 왜곡한다. 이 shadertoy를 베이스로 살짝 조정을 통해 이펙트의 스케일을 쉽게 조절할 수 있다.
[...]

float Width;
float Mask;
float Compression;
float Intensity;
float ChromaShift;

void HaloPS(
    in noperspective float4 UVAndScreenPos : TEXCOORD0,
    out float3 OutColor : SV_Target0)
{
    const float2 CenterPoint = float2( 0.5f, 0.5f );

    // UVs
    float2 UV = UVAndScreenPos.xy;
    float2 FishUV = FisheyeUV( UV, Compression, 1.0f );

    // Distortion vector
    float2 HaloVector = normalize( CenterPoint - UV ) * Width;

    // Halo mask
    float HaloMask = distance( UV, CenterPoint );
    HaloMask = saturate(HaloMask * 2.0f);
    HaloMask = smoothstep( Mask, 1.0f, HaloMask );

    // Screen border mask
    float2 ScreenPos = UVAndScreenPos.zw;
    float ScreenborderMask = DiscMask(ScreenPos);
    ScreenborderMask *= DiscMask(ScreenPos * 0.8f);
    ScreenborderMask = ScreenborderMask * 0.95 + 0.05; // Scale range

    // Chroma offset
    float2 UVr = (FishUV - CenterPoint) * (1.0f + ChromaShift) + CenterPoint + HaloVector;
    float2 UVg = FishUV + HaloVector;
    float2 UVb = (FishUV - CenterPoint) * (1.0f - ChromaShift) + CenterPoint + HaloVector;

    // Sampling
    OutColor.r = Texture2DSample( InputTexture, InputSampler, UVr ).r;
    OutColor.g = Texture2DSample( InputTexture, InputSampler, UVg ).g;
    OutColor.b = Texture2DSample( InputTexture, InputSampler, UVb ).b;

    OutColor.rgb *= ScreenborderMask * HaloMask * Intensity;

}
위에서 언급되었다 시피, 모든 작업은 UV 좌표를 바꾸는 것으로 행해진다. 피쉬아이 UV는 먼저 계산되고, HaloVector가 화면 중앙으로부터 방향을 계산한다. 샘플링이 발생할때 UV좌표에 추가된다.
유령과 달리 크로마 효과는 동일한 셰이더 내에서 세개의 별도 샘플을 통해 수행된다. 마지막에 결과는 일부 아티팩트를 숨기기 위해 몇가지 사용자 정의 마스크로 마스킹 된다. DiscMask()함수에 주목하자면 이 함수는 radial/vignette 타입의 마스킹을 생성하는 데 사용된다. 마스크가 너무 많은 색상을 플러시 하지 않도록 하기 위해 범위가 순수한 블랙으로 가는 값을 피하기 위해 조정된다.
TODO_FLARE_HALO
    {
        // Render shader
        const FString PassName("LensFlareHalo");

        TShaderMapRef<FCustomScreenPassVS> VertexShader(View.ShaderMap);
        TShaderMapRef<FLensFlareHaloPS> PixelShader(View.ShaderMap);

        FLensFlareHaloPS::FParameters* PassParameters = GraphBuilder.AllocParameters<FLensFlareHaloPS::FParameters>();
        PassParameters->Pass.InputTexture       = InputTexture;
        PassParameters->Pass.RenderTargets[0]   = FRenderTargetBinding(OutputTexture, ERenderTargetLoadAction::ELoad);
        PassParameters->InputSampler            = BilinearBorderSampler;
        PassParameters->Intensity               = PostProcessAsset->HaloIntensity;
        PassParameters->Width                   = PostProcessAsset->HaloWidth;
        PassParameters->Mask                    = PostProcessAsset->HaloMask;
        PassParameters->Compression             = PostProcessAsset->HaloCompression;
        PassParameters->ChromaShift             = PostProcessAsset->HaloChromaShift;

        DrawShaderPass(
            GraphBuilder,
            PassName,
            PassParameters,
            VertexShader,
            PixelShader,
            AdditiveBlendState,
            Viewport2
        );
    }
이 렌더링 패스는 이전과는 약간 다른게, 새로운 버퍼를 생성하는 대신 이미 고스트가 포함된 이전 버퍼에 덮어쓰기를 한다.
중간버퍼에 그려서 고스트 위에 복사하는 것은 의미가 없다. 따라서 기존 콘텐츠 위에 그냥 덮어 씌우는 것이 더 빠르고 저렴하다. 추가 모드로 설정되어 있고, 렌즈 플레어는 조명 정보이므로 이 방법이 잘 작동한다.
아직 문제가 있는데 가끔 아티팩트나 엘리어싱이 눈에 띈다.
이러한 문제를 해결하기 위해 여러가지 시도를 해보았지만, 단순히 블러링 하는 것이 가장 효과적이었다. 고스트와 결합된 헤일로를 같이 블러링하는 것 또한 하나의 어드벤티지다.
따라서, 마지막에 단순히 블러 함수를 호출해 주기만 하면 된다.
    {
        OutputTexture = RenderBlur(
            GraphBuilder,
            OutputTexture,
            View,
            Viewport2,
            1
        );
    }

    return OutputTexture;

} // End of RenderFlare()
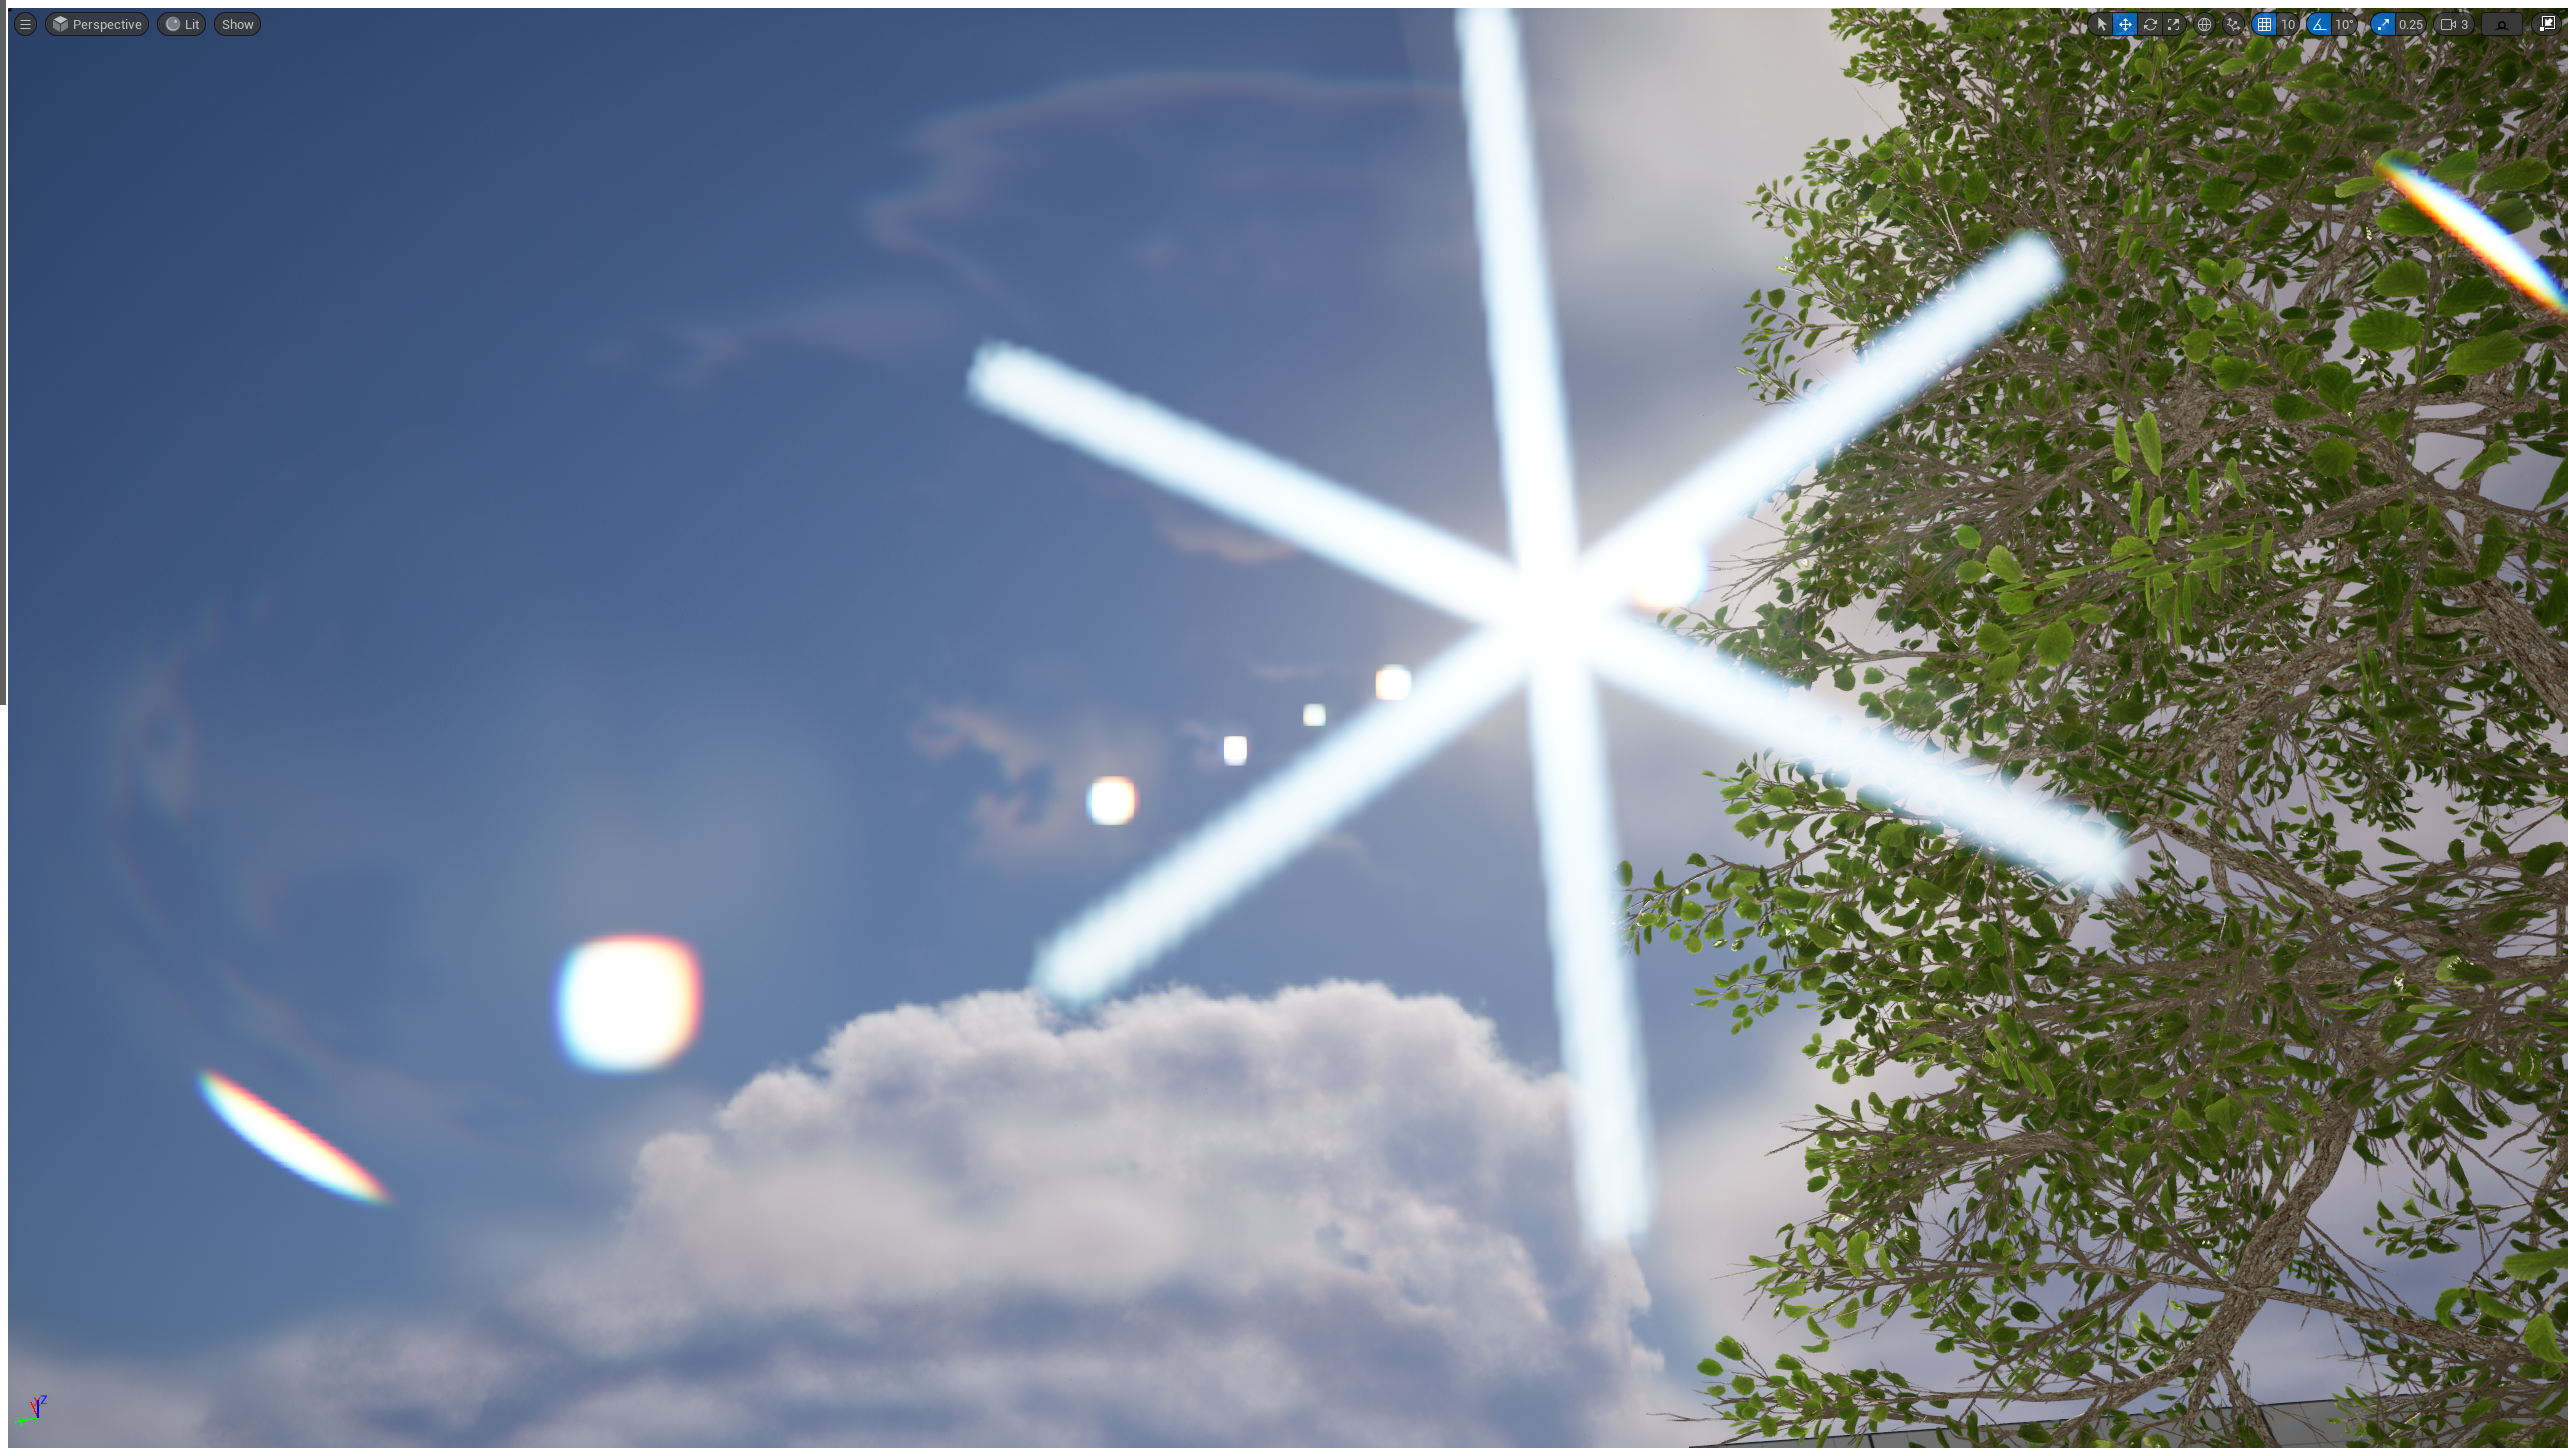
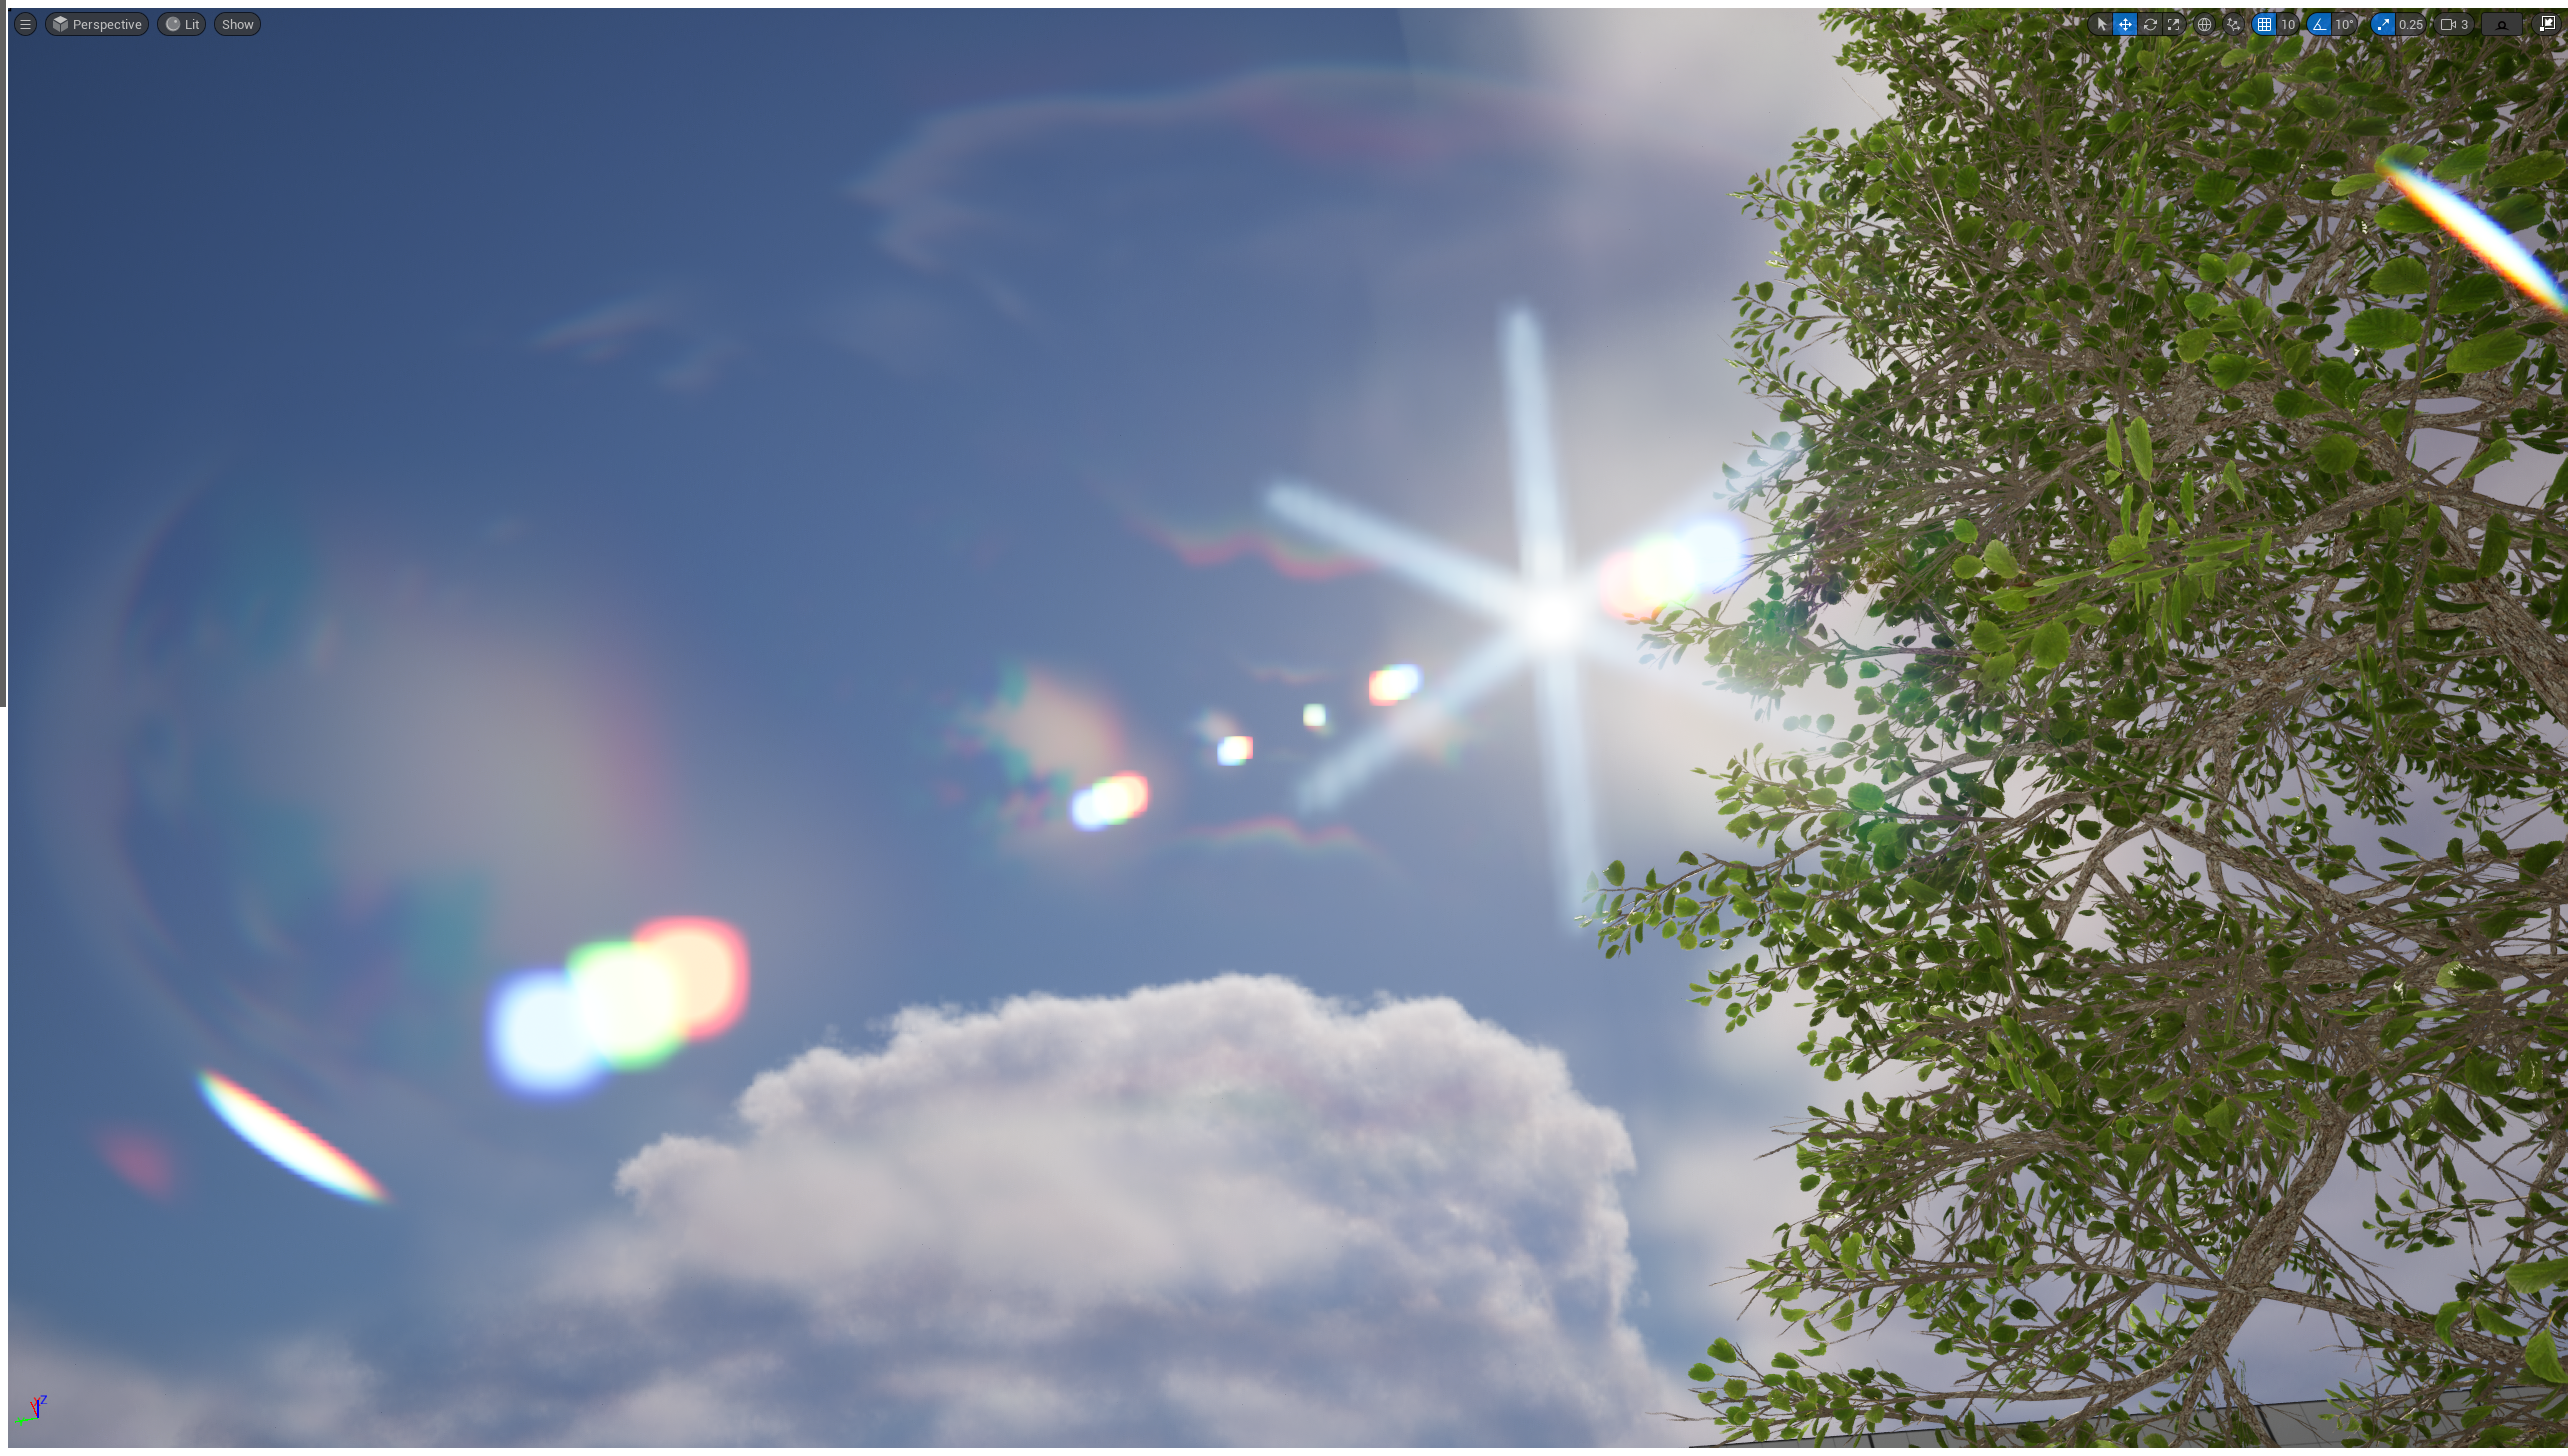
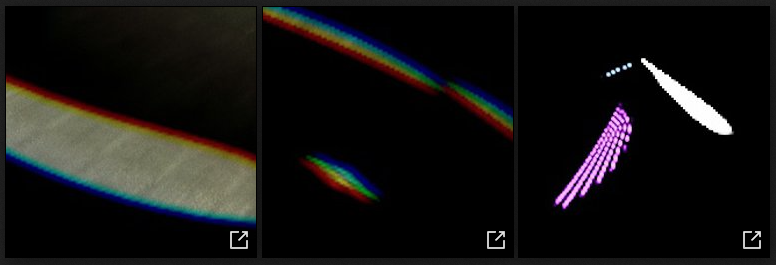
13. Glare Pass
이 패스는 배트맨에서 영감을 많이 받았다고 한다.
빛을 생성하기 위한 또 다른 방법은 입력 버퍼에서 여러 방향으로 블러를 수행하고 이를 결합하여 이러한 빛 줄기를 만드는 것이다.이는 마사키 카와세가 이 발표에서 시연한 대로다.
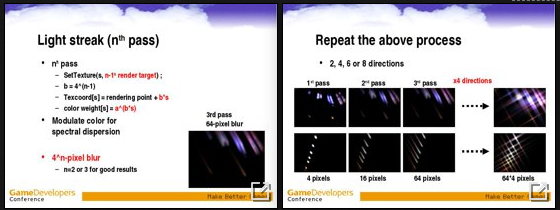
이 방법을 선택하지 않은 이유는 색상, 크기를 제어하기가 더 어렵고 많은 패스가 필요하며, 프로세스의 본질상 작은 세부 사항이 쉽게 손실될 수 있기 때문이다.
작성자가 새롭게 테스트한 길은 보다 성능이 좋고 멋진 것을 찾는 것이 어려웠다. 처음에는 Unreal Bokeh블러와 같은 아이디어로 버전을 만들었다: 각 픽셀마다 인스턴스화 되고 늘어난 사각형을 그려 별 모양을 만들었다. 각 필셀당 하나의 사각형만 그려지기 때문에 최소한 3개의 사각형이 필요하며, 교차점마다 6개의 가지가 생성된다. 이는 2x2블록으로 픽셀을 그룹화하고 각 블록마다 3개의 사각형이 할당되도록 구현되었다. 이 아이디어가 동작할 수 있다는 것을 입증했지만 여전히 성능이 좋지 않았다. GPU에서 사각형이 발산되는 방식에는 일정한 비용이 발생하는데, 아무 것도 그려지지 않을 때에도 높은 고정 비용이 발생했다.(또한 유사한 아이디어가 과거에 시도되었음을 알게 되었다.)
그래서 작성자는 프로세스를 분리하는 방식으로 접근해 보았다.
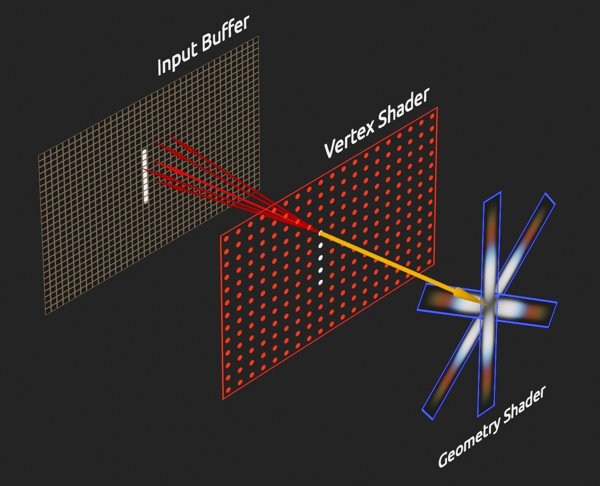
(이 도식에서 픽셀 셰이더가 가독성을 위해 지오메트리 셰이더와 결합되었음.)
직접적으로 사각형을 렌더링하는 대신 포인트를 사용한다.(하나당 네개의 픽셀 그룹)
버텍스 셰이더에서는 포인트 위치 주변의 여러 픽셀이 샘플링 된다. 결과가 결합되고 밝기가 계산된다.그런 다음 지오메트리 셰이더가 따라오고 이전의 밝기가 충분히 높으면 세개의 사각형을 방출한다.
만약 어떤 포인트도 유효하지 않다면, 아무것도 래스터화 되지 않는다. 포인트를 발사하는 기본 비용은 매우 낮다. 모든 작업은 이제 지오메트리 셰이더 내에서 이루어지며 이를 쉽게 건너뛸 수 있다. 최종 비용은 이제 서로 겹치는 많은 사각형이 있을 때 겹침으로 인한 비용이 된다.
아래는 각 포인트의 샘플링 패턴이다:
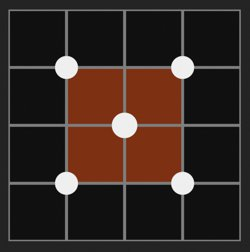
기본적으로, 2x2 픽셀 블록에 대해 중심과 각 모서리에서 정보를 읽는다. 이 때, 이중 선형 보간으로 픽셀을 읽기 때문에 많은 정보를 읽을 수 있다. 픽셀 값은 중심에서 더 큰 가중치로 계산된다.
이 패턴은 전환 및 카메라 이동을 더 안정적으로 만드는 장점이 있다. 그렇지 않으면 Glare 효과가 Threshold 패스에서 보이는 것처럼 펄스가 나오거나 깜박일 수 있다. 여러번의 시행착오 끝에, 시각적으로 충분한 상태로 유지되면서도 저렴한(단 5회의 읽기만 필요한)이 사용자 정의 패턴을 고안했다. 더 많은 정보와 밝기를 잃지 않으면서 효과를 더 안정적으로 만드는 방법은 아직 찾이 못했다고 한다.
Glare효과를 구현하기 위해 세개의 셰이더(버텍스, 지오메트리, 픽셀)가 필요하므로, 이 패스는 이전 것들과 약간 다르게 구성된다.
TODO_SHADER_GLARE
	// Glare shader pass
	class FLensFlareGlareVS : public FGlobalShader
	{
	public:
	    DECLARE_GLOBAL_SHADER(FLensFlareGlareVS);
	    SHADER_USE_PARAMETER_STRUCT(FLensFlareGlareVS, FGlobalShader);

	    BEGIN_SHADER_PARAMETER_STRUCT(FParameters, )
	        SHADER_PARAMETER_STRUCT_INCLUDE(FCustomLensFlarePassParameters, Pass)
	        SHADER_PARAMETER_SAMPLER(SamplerState, InputSampler)
	        SHADER_PARAMETER(FIntPoint, TileCount)
	        SHADER_PARAMETER(FVector4f, PixelSize)
	        SHADER_PARAMETER(FVector2f, BufferSize)
	    END_SHADER_PARAMETER_STRUCT()
	};
	class FLensFlareGlareGS : public FGlobalShader
	{
	public:
	    DECLARE_GLOBAL_SHADER(FLensFlareGlareGS);
	    SHADER_USE_PARAMETER_STRUCT(FLensFlareGlareGS, FGlobalShader);

	    BEGIN_SHADER_PARAMETER_STRUCT(FParameters, )
	        SHADER_PARAMETER(FVector4f, PixelSize)
	        SHADER_PARAMETER(FVector2f, BufferSize)
	        SHADER_PARAMETER(FVector2f, BufferRatio)
	        SHADER_PARAMETER(float, GlareIntensity)
	        SHADER_PARAMETER(float, GlareDivider)
	        SHADER_PARAMETER(FVector4f, GlareTint)
	        SHADER_PARAMETER_SCALAR_ARRAY(float, GlareScales, [3])
	    END_SHADER_PARAMETER_STRUCT()
	};
	class FLensFlareGlarePS : public FGlobalShader
	{
	public:
	    DECLARE_GLOBAL_SHADER(FLensFlareGlarePS);
	    SHADER_USE_PARAMETER_STRUCT(FLensFlareGlarePS, FGlobalShader);

	    BEGIN_SHADER_PARAMETER_STRUCT(FParameters, )
	        SHADER_PARAMETER_SAMPLER(SamplerState, GlareSampler)
	        SHADER_PARAMETER_TEXTURE(Texture2D, GlareTexture)
	    END_SHADER_PARAMETER_STRUCT()

	        static bool ShouldCompilePermutation(const FGlobalShaderPermutationParameters& Parameters)
	    {
	        return IsFeatureLevelSupported(Parameters.Platform, ERHIFeatureLevel::SM5);
	    }
	};
	IMPLEMENT_GLOBAL_SHADER(FLensFlareGlareVS, "/CustomShaders/Glare.usf", "GlareVS", SF_Vertex);
	IMPLEMENT_GLOBAL_SHADER(FLensFlareGlareGS, "/CustomShaders/Glare.usf", "GlareGS", SF_Geometry);
	IMPLEMENT_GLOBAL_SHADER(FLensFlareGlarePS, "/CustomShaders/Glare.usf", "GlarePS", SF_Pixel);
대부분의 셰이더 셋업은 이전 단계에서 보던 것들과 비슷하다. 처음보는 파라미터 매크로는 SHADER_PARAMETER_TEXTURE가 있는데, 이 매크로를 사용하면 일반적인 텍스처를 선언할 수 있다. 콘텐츠 브라우저에서 보는 것처럼 할 수 있다.
우리가 연결할 텍스처는 데이터 에셋에서 가져오는 라인 마스크다. (위의 도식도의 지오메트리 셰이더 부분에서 볼 수 있음.)
RenderGlare()함수를 작성해 본다.
TODO_GLARE
FRDGTextureRef UPostProcessSubsystem::RenderGlare(
    FRDGBuilder& GraphBuilder,
    FRDGTextureRef InputTexture,
    FIntRect& InputRect,
    const FViewInfo& View
)
{
    RDG_EVENT_SCOPE(GraphBuilder, "GlarePass");

    FRDGTextureRef OutputTexture = nullptr;

    FIntRect Viewport4 = FIntRect(
        0,
        0,
        View.ViewRect.Width() / 4,
        View.ViewRect.Height() / 4
    );

    // Only render the Glare if its intensity is different from 0
    if (PostProcessAsset->GlareIntensity > SMALL_NUMBER)
    {
        const FString PassName("LensFlareGlare");

        // This compute the number of point that will be drawn
        // Since we want one point for 2 by 2 pixel block we just
        // need to divide the resolution by two to get this value.
        FIntPoint TileCount = Viewport4.Size();
        TileCount.X = TileCount.X / 2;
        TileCount.Y = TileCount.Y / 2;
        int32 Amount = TileCount.X * TileCount.Y;

        // Compute the ratio between the width and height
        // to know how to adjust the scaling of the quads.
        // (This assume width is bigger than height.)
        FVector2f BufferRatio = FVector2f(
            float(Viewport4.Height()) / float(Viewport4.Width()),
            1.0f
        );

        // Build the buffer
        FRDGTextureDesc Description = InputTexture->Desc;
        Description.Reset();
        Description.Extent = Viewport4.Size();
        Description.Format = PF_FloatRGB;
        Description.ClearValue = FClearValueBindingTransparent;
        FRDGTextureRef GlareTexture = GraphBuilder.CreateTexture(Description, *PassName);

        // Setup a few other variables that will
        // be needed by the shaders.
        FVector4f PixelSize = FVector4f(0, 0, 0, 0);
        PixelSize.X = 1.0f / float(Viewport4.Width());
        PixelSize.Y = 1.0f / float(Viewport4.Height());
        PixelSize.Z = PixelSize.X;
        PixelSize.W = PixelSize.Y * -1.0f;

        FVector2f BufferSize = FVector2f(Description.Extent);
[...]
이 렌더링 패스는 if문 안에 있는데, 강도(Intensity)가 너무 작다고 여겨지면 쉽게 컴퓨팅을 제거할 수 있다. 마지막에 보이지 않을 것을 렌더링 할 필요는 없다. 그런 다음 몇가지 변수를 셋업한다.
주석에 달린 것처럼, 그릴 포인트의 양은 쿼드를 그릴 버퍼의 해상도에 의해 결정된다. 그러나 2x2픽셀 블록당 1개의 포인트만 그리고 싶으므로 해상도를 반으로 나눈다.
다음은 셰이더 파라미터 셋업이다:
[...]

        // Setup shader
		FCustomLensFlarePassParameters* PassParameters = GraphBuilder.AllocParameters<FCustomLensFlarePassParameters>();
		PassParameters->InputTexture = InputTexture;
		PassParameters->RenderTargets[0] = FRenderTargetBinding(GlareTexture, ERenderTargetLoadAction::EClear);

		// Vertex shader
		FLensFlareGlareVS::FParameters VertexParameters;
		VertexParameters.Pass = *PassParameters;
		VertexParameters.InputSampler = BilinearBorderSampler;
		VertexParameters.TileCount = TileCount;
		VertexParameters.PixelSize = PixelSize;
		VertexParameters.BufferSize = BufferSize;

		// Geometry shader
		FLensFlareGlareGS::FParameters GeometryParameters;
		GeometryParameters.BufferSize = BufferSize;
		GeometryParameters.BufferRatio = BufferRatio;
		GeometryParameters.PixelSize = PixelSize;
		GeometryParameters.GlareIntensity = PostProcessAsset->GlareIntensity;
		GeometryParameters.GlareTint = FVector4f(PostProcessAsset->GlareTint);
		GET_SCALAR_ARRAY_ELEMENT(GeometryParameters.GlareScales, 0) = PostProcessAsset->GlareScale.X;
		GET_SCALAR_ARRAY_ELEMENT(GeometryParameters.GlareScales, 1) = PostProcessAsset->GlareScale.Y;
		GET_SCALAR_ARRAY_ELEMENT(GeometryParameters.GlareScales, 2) = PostProcessAsset->GlareScale.Z;
		GeometryParameters.GlareDivider = FMath::Max(PostProcessAsset->GlareDivider, 0.01f);

		// Pixel shader
		FLensFlareGlarePS::FParameters PixelParameters;
		PixelParameters.GlareSampler = BilinearClampSampler;
		PixelParameters.GlareTexture = GWhiteTexture->TextureRHI;

		if (PostProcessAsset->GlareLineMask != nullptr)
		{
		    const FTextureRHIRef TextureRHI = PostProcessAsset->GlareLineMask->Resource->TextureRHI;
		    PixelParameters.GlareTexture = TextureRHI;
		}

		TShaderMapRef<FLensFlareGlareVS> VertexShader(View.ShaderMap);
		TShaderMapRef<FLensFlareGlareGS> GeometryShader(View.ShaderMap);
		TShaderMapRef<FLensFlareGlarePS> PixelShader(View.ShaderMap);

[...]
여기서 유일한 특이점은 RDG버퍼가 아닌 2D Texture를 파라미터로 연결한다는 점이다.
데이터 에셋의 텍스처가 invalid한 경우, GlareTexture는 디폴트 엔진 텍스처인 GWhiteTexture를 연결한다. 아닌 경우는 리소스를 그냥 할당한다. 이것은 크래쉬 없이 리소스를 변경할 수 있게 해준다.
이제 실제 렌더링 패스다.
		[...]
        // Required for Lambda capture
        FRHIBlendState* BlendState = this->AdditiveBlendState;

        GraphBuilder.AddPass(
            RDG_EVENT_NAME("%s", *PassName),
            PassParameters,
            ERDGPassFlags::Raster,
            [
                VertexShader, VertexParameters,
                    GeometryShader, GeometryParameters,
                    PixelShader, PixelParameters,
                    BlendState, Viewport4, Amount
            ] (FRHICommandListImmediate& RHICmdList)
            {
                RHICmdList.SetViewport(
                    Viewport4.Min.X, Viewport4.Min.Y, 0.0f,
                    Viewport4.Max.X, Viewport4.Max.Y, 1.0f
                );

                FGraphicsPipelineStateInitializer GraphicsPSOInit;
                RHICmdList.ApplyCachedRenderTargets(GraphicsPSOInit);
                GraphicsPSOInit.BlendState = BlendState;
                GraphicsPSOInit.RasterizerState = TStaticRasterizerState<>::GetRHI();
                GraphicsPSOInit.DepthStencilState = TStaticDepthStencilState<false, CF_Always>::GetRHI();
                GraphicsPSOInit.BoundShaderState.VertexDeclarationRHI = GEmptyVertexDeclaration.VertexDeclarationRHI;
                GraphicsPSOInit.BoundShaderState.VertexShaderRHI = VertexShader.GetVertexShader();
                GraphicsPSOInit.BoundShaderState.GeometryShaderRHI = GeometryShader.GetGeometryShader();
                GraphicsPSOInit.BoundShaderState.PixelShaderRHI = PixelShader.GetPixelShader();
                GraphicsPSOInit.PrimitiveType = PT_PointList;
                SetGraphicsPipelineState(RHICmdList, GraphicsPSOInit);

                SetShaderParameters(RHICmdList, VertexShader, VertexShader.GetVertexShader(), VertexParameters);
                SetShaderParameters(RHICmdList, GeometryShader, GeometryShader.GetGeometryShader(), GeometryParameters);
                SetShaderParameters(RHICmdList, PixelShader, PixelShader.GetPixelShader(), PixelParameters);

                RHICmdList.SetStreamSource(0, nullptr, 0);
                RHICmdList.DrawPrimitive(0, 1, Amount);
            });

        OutputTexture = GlareTexture;

    } // End of if()

    return OutputTexture;

} // End of RenderGlare()
여기서 중요한 점은
- AddPass()가 람다로 셋업하기 때문에, 람다에서 캡처가 가능하도록
BlendState변수를 사용해야 한다. - 이번에는 삼각형이 아닌 점을 그리기 때문에
PrimitiveType을PT_PointList로 설정한다.DrawPrimitive()에서는 한 번에 하나의 정점만 그려야 함을 명시한다.(두 번째 인자.) - 지오메트리 셰이더는 버텍스 및 픽셀 셰이더와 마찬가지로
FGraphicsPipelineStateInitializer의GeometryShaderRHI멤버 변수를 통해 참조된다. 또한 해당 셰이더에 대한 매개 변수 설정도 호출된다.
셰이더 파일로 간다. Glare.usf에서 각각의 셰이더 타입에 대한 함수를 작성한다. 자세한 내용은 주석을 참고하자.
버텍스 셰이더
#include "Shared.ush"

uint2 TileCount;
float GlareIntensity;
DECLARE_SCALAR_ARRAY(float, GlareScales, 3);
float4 GlareTint;
float2 BufferSize;
float4 PixelSize;
float2 BufferRatio;
float GlareDivider;
SamplerState GlareSampler;
Texture2D GlareTexture;

// This struct is used to pass information from the
// Vertex shader to the Geometry shader.
struct FVertexToGeometry
{
    float4 Position : SV_POSITION;
    float3 Color    : TEXCOORD0;
    float Luminance : TEXCOORD1;
    uint ID         : TEXCOORD2;
};

void GlareVS(
    uint VId : SV_VertexID,
    uint IId : SV_InstanceID,
    out FVertexToGeometry Output
)
{
    // TilePos is the position of the point based on its ID.
    // Since we know how many points will be drawn in total
    // (because its defined from the code), we can figure out
    // how many points will be draw per line and therefor their
    // coordinates. From this we can compute the UV coordinate
    // of the point.
    float2 TilePos = float2( IId % TileCount.x, IId / TileCount.x );
    float2 UV = TilePos / BufferSize * 2.0f;

    // Coords and Weights are local positions and intensities for
    // the pixels we are gonna sample. Since we have one point
    // for four pixels (two by two) we want to sample multiple
    // times the buffer to avoid missing information which
    // would create holes or artifacts.
    // This pattern doesn't sample exactly the 4 pixels in a block
    // but instead sample in the middle and at the corners to take
    // advantage of bilinear sampling to average more values.
    const float2 Coords[5] = {
        float2( -1.0f,  1.0f ),
        float2(  1.0f,  1.0f ),

        float2(  0.0f,  0.0f ),

        float2( -1.0f, -1.0f ),
        float2(  1.0f, -1.0f )
    };

    const float Weights[5] = {
        0.175, 0.175,
            0.3,
        0.175, 0.175
    };

    // Since the UV coordinate is the middle position of the top right
    // pixel in the 2x2 block, we offset it to get the middle of the block.
    // Then in the loop we use the local offsets to go sample neighbor pixels.
    float2 CenterUV = UV + PixelSize.xy * float2( -0.5f, -0.5f );

    float3 Color = float3(0.0f,0.0f,0.0f);

    UNROLL
    for( int i = 0; i < 5; i++ )
    {
        float2 CurrentUV = CenterUV + Coords[i] * PixelSize.xy * 1.5f;
        Color += Weights[i] * Texture2DSampleLevel(InputTexture, InputSampler, CurrentUV, 0).rgb;
    }

    Output.Luminance = dot( Color.rgb, 1.0f );
    Output.ID       = IId;
    Output.Color    = Color;
    Output.Position = float4( TilePos.x, TilePos.y, 0, 1 );
}

[...]
지오메트리 셰이더
[...]

// Same as with the Vertex shader, this struct is used to
// pass information computed by the Geometry shader into
// the Fragment/Pixel shader.
struct FGeometryToPixel
{
    float4 Position : SV_POSITION;
    float2 UV : TEXCOORD0;
    float3 Color : TEXCOORD1;
};

// This function goal is to figure out the actual position
// (in range 0-1) of a given vertex based on the original
// point position. This function also take into account
// the angle and scale of the quad to compute the target
// position of the final vertex.
float4 ComputePosition( float2 TilePos, float2 UV, float2 Scale, float Angle )
{
    // Compute the position of the quad based on the ID
    // Some multiply/divide by two magic to get the proper coordinates
    float2 BufferPosition = (TilePos - float2(0.25f, 0.25f)) / BufferSize;
    BufferPosition = 4.0f * BufferPosition - 1.0f;

    // Center the quad in the middle of the screen
    float2 NewPosition = 2.0f * (UV - 0.5f);

    // Scale the quad
    NewPosition *= Scale;

    // Rotate th equad
    float Sinus         = sin( Angle );
    float Cosinus       = cos( Angle );
    float2 RotatedPosition = float2(
        (NewPosition.x * Cosinus) - (NewPosition.y * Sinus),
        (NewPosition.x * Sinus)   + (NewPosition.y * Cosinus)
    );

    // Scale quad to compensate the buffer ratio
    RotatedPosition *= BufferRatio;

    // Position quad where pixel is in the buffer
    RotatedPosition += BufferPosition * float2(1.0f, -1.0f);

    // Build final vertex position
    float4 OutPosition = float4( RotatedPosition.x, RotatedPosition.y,0,1);

    return OutPosition;
}

// This is the main function and maxvertexcount is a required keyword
// to indicate how many vertices the Geometry shader will produce.
// (12 vertices = 3 quads, 4 vertices per quad)
[maxvertexcount(12)]
void GlareGS(
    point FVertexToGeometry Inputs[1],
    inout TriangleStream<FGeometryToPixel> OutStream
)
{
    // It's (apparently) not possible to access to
    // the FVertexToGeometry struct members directly,
    // so it needs to be put into an intermediate
    // variable like this.
    FVertexToGeometry Input = Inputs[0];

    if( Input.Luminance > 0.1f )
    {
        float2 PointUV = Input.Position.xy / BufferSize * 2.0f;
        float MaxSize = max( BufferSize.x, BufferSize.y );

        // Final quad color
        float3 Color = Input.Color * GlareTint.rgb * GlareTint.a * GlareIntensity;

        // Compute the scale of the glare quad.
        // The divider is used to specify the referential point of
        // which light is bright or not and normalize the result.
        float LuminanceScale = saturate( Input.Luminance / GlareDivider );

        // Screen space mask to make the glare shrink at screen borders
        float Mask = distance( PointUV - 0.5f, float2(0.0f, 0.0f) );
        Mask = 1.0f - saturate( Mask * 2.0f );
        Mask = Mask * 0.6f + 0.4f;

        float2 Scale = float2(
            LuminanceScale * Mask,
            (1.0f / min( BufferSize.x, BufferSize.y )) * 4.0f
        );

        // Setup rotation angle
        const float Angle30 = 0.523599f;
        const float Angle60 = 1.047197f;
        const float Angle90 = 1.570796f;
        const float Angle150 = 2.617994f;

        // Additional rotation based on screen position to add
        // more variety and make the glare rotate with the camera.
        float AngleOffset = (PointUV.x * 2.0f - 1.0f) * Angle30;

        float AngleBase[3] = {
            AngleOffset + Angle90,
            AngleOffset + Angle30, // 90 - 60
            AngleOffset + Angle150 // 90 + 60
        };

        // Quad UV coordinates of each vertex
        // Used as well to know which vertex of the quad is
        // being computed (by its position).
        // The order is important to ensure the triangles
        // will be front facing and therefore visible.
        const float2 QuadCoords[4] = {
            float2(  0.0f,  0.0f ),
            float2(  1.0f,  0.0f ),
            float2(  1.0f,  1.0f ),
            float2(  0.0f,  1.0f )
        };

        // Generate 3 quads
        for( int i = 0; i < 3; i++ )
        {
            // Emit a quad by producing 4 vertices
            if( GlareScales[i] > 0.0001f )
            {
                float2 QuadScale = Scale * GlareScales[i];
                float QuadAngle = AngleBase[i];

                FGeometryToPixel Vertex0;
                FGeometryToPixel Vertex1;
                FGeometryToPixel Vertex2;
                FGeometryToPixel Vertex3;

                Vertex0.UV = QuadCoords[0];
                Vertex1.UV = QuadCoords[1];
                Vertex2.UV = QuadCoords[2];
                Vertex3.UV = QuadCoords[3];

                Vertex0.Color = Color;
                Vertex1.Color = Color;
                Vertex2.Color = Color;
                Vertex3.Color = Color;

                Vertex0.Position = ComputePosition( Input.Position.xy, Vertex0.UV, QuadScale, QuadAngle );
                Vertex1.Position = ComputePosition( Input.Position.xy, Vertex1.UV, QuadScale, QuadAngle );
                Vertex2.Position = ComputePosition( Input.Position.xy, Vertex2.UV, QuadScale, QuadAngle );
                Vertex3.Position = ComputePosition( Input.Position.xy, Vertex3.UV, QuadScale, QuadAngle );

                // Produce a strip of Polygon. A triangle is
                // just 3 vertex produced in a row which end-up
                // connected, the last vertex re-use two previous
                // ones to build the second triangle.
                // This is why Vertex3 is not the last one, to ensure
                // the triangle is built with the right points.
                OutStream.Append(Vertex0);
                OutStream.Append(Vertex1);
                OutStream.Append(Vertex3);
                OutStream.Append(Vertex2);

                // Finish the strip and end the primitive generation
                OutStream.RestartStrip();
            }
        }
    }
}

[...]
픽셀 셰이더
[...]

void GlarePS(
    FGeometryToPixel Input,
    out float3 OutColor : SV_Target0 )
{
    float3 Mask = Texture2DSampleLevel(GlareTexture, GlareSampler, Input.UV, 0).rgb;
    OutColor.rgb = Mask * Input.Color.rgb;
}
14. Final Mixing Pass
모든 렌더 패스가 끝났고 이것들을 블룸과 함께 결합해야한다. 셰이더부터 빌드한다.
TODO_SHADER_MIX
	// Final bloom mix shader
	class FLensFlareBloomMixPS : public FGlobalShader
	{
	public:
	    DECLARE_GLOBAL_SHADER(FLensFlareBloomMixPS);
	    SHADER_USE_PARAMETER_STRUCT(FLensFlareBloomMixPS, FGlobalShader);

	    BEGIN_SHADER_PARAMETER_STRUCT(FParameters, )
	        SHADER_PARAMETER_STRUCT_INCLUDE(FCustomLensFlarePassParameters, Pass)
	        SHADER_PARAMETER_SAMPLER(SamplerState, InputSampler)
	        SHADER_PARAMETER_RDG_TEXTURE(Texture2D, BloomTexture)
	        SHADER_PARAMETER_RDG_TEXTURE(Texture2D, GlareTexture)
	        SHADER_PARAMETER_TEXTURE(Texture2D, GradientTexture)
	        SHADER_PARAMETER_SAMPLER(SamplerState, GradientSampler)
	        SHADER_PARAMETER(FVector4f, Tint)
	        SHADER_PARAMETER(FVector2f, InputViewportSize)
	        SHADER_PARAMETER(FVector2f, BufferSize)
	        SHADER_PARAMETER(FVector2f, PixelSize)
	        SHADER_PARAMETER(FIntVector, MixPass)
	        SHADER_PARAMETER(float, Intensity)
	        END_SHADER_PARAMETER_STRUCT()

	        static bool ShouldCompilePermutation(const FGlobalShaderPermutationParameters& Parameters)
	    {
	        return IsFeatureLevelSupported(Parameters.Platform, ERHIFeatureLevel::SM5);
	    }
	};
	IMPLEMENT_GLOBAL_SHADER(FLensFlareBloomMixPS, "/CustomShaders/Mix.usf", "MixPS", SF_Pixel);
Mix.usf
#include "Shared.ush"

Texture2D BloomTexture;
Texture2D GlareTexture;
Texture2D GradientTexture;
SamplerState GradientSampler;

float Intensity;
float4 Tint;
float2 BufferSize;
float2 PixelSize;
int3 MixPass;

void MixPS(
    in noperspective float4 UVAndScreenPos : TEXCOORD0,
    out float4 OutColor : SV_Target0 )
{
    float2 UV = UVAndScreenPos.xy;
    OutColor.rgb = float3( 0.0f, 0.0f, 0.0f );
    OutColor.a = 0;

    //---------------------------------------
    // Add Bloom
    //---------------------------------------
    if( MixPass.x )
    {
        OutColor.rgb += Texture2DSample( BloomTexture, InputSampler, UV * InputViewportSize ).rgb;
    }

    //---------------------------------------
    // Add Flares, Glares mixed with Tint/Gradient
    //---------------------------------------
    float3 Flares = float3( 0.0f, 0.0f, 0.0f );

    // Flares
    if( MixPass.y )
    {
        Flares += Texture2DSample( InputTexture, InputSampler, UV ).rgb;
    }

    // Glares
    // Do 4 samples in a square pattern to smooth the
    // glare pass result and hide a few artifacts.
    if( MixPass.z )
    {
        const float2 Coords[4] = {
            float2(-1.0f, 1.0f),
            float2( 1.0f, 1.0f),
            float2(-1.0f,-1.0f),
            float2( 1.0f,-1.0f)
        };

        float3 GlareColor = float3( 0.0f, 0.0f, 0.0f );

        UNROLL
        for( int i = 0; i < 4; i++ )
        {
            float2 OffsetUV = UV + PixelSize * Coords[i];
            GlareColor.rgb += 0.25f * Texture2DSample( GlareTexture, InputSampler, OffsetUV ).rgb;
        }

        Flares += GlareColor;
    }

    const float2 Center = float2( 0.5f, 0.5f );
    float2 GradientUV = float2(
        saturate( distance(UV, Center) * 2.0f ),
        0.0f
    );
    float3 Gradient = Texture2DSample( GradientTexture, GradientSampler, GradientUV ).rgb;

    // Final mix
    OutColor.rgb += Flares * Gradient * Tint.rgb * Intensity;
}
여기서 간단히 블룸, 고스트, 글레어를 합친다. 최종적인 외관은 스크린 스페이스에서 1D gradient texture로 색조가 추가되어 전반적인 색조를 더한다.
일부 패스가 invalid할 수 있기 때문에, if()안에 설정되어 있다. MixPass가 코드에서 설정된 부울로 작동해(아래참조) 패스가 실행되는 지 여부를 결정한다.
글레어가 4개의 샘플로 읽히는 것을 볼 수 있는데, 이는 일부 엘리어싱을 숨기고 외관을 부드럽게 만들기 위한 것이다. 한번도 이중선형보간을 활용하는 것이다.
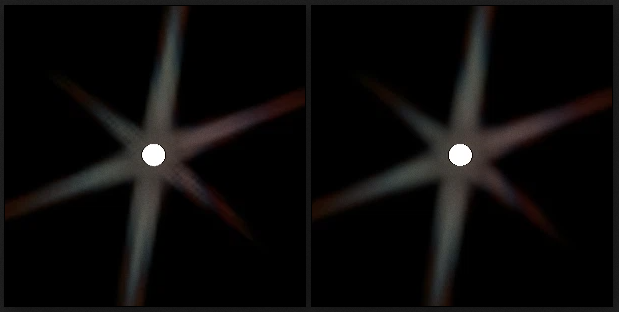
(1sample vs 4 samples at corners)
이제 RenderLensFlare()로 돌아가 마무리하자.
TODO_MIX
[...]
{
    const FString PassName("LensFlareMix");

    FIntRect MixViewport = FIntRect(
        0,
        0,
        View.ViewRect.Width() / 2,
        View.ViewRect.Height() / 2
    );

    FVector2f BufferSize = FVector2f(MixViewport.Width(), MixViewport.Height());

    // Create buffer
    FRDGTextureDesc Description = Inputs.Bloom.Texture->Desc;
    Description.Reset();
    Description.Extent = MixViewport.Size();
    Description.Format = PF_FloatRGBA;
    Description.ClearValue = FClearValueBindingTransparent;
    FRDGTextureRef MixTexture = GraphBuilder.CreateTexture(Description, *PassName);

    // Shader parameters
    TShaderMapRef<FCustomScreenPassVS> VertexShader(View.ShaderMap);
    TShaderMapRef<FLensFlareBloomMixPS> PixelShader(View.ShaderMap);

    FLensFlareBloomMixPS::FParameters* PassParameters = GraphBuilder.AllocParameters<FLensFlareBloomMixPS::FParameters>();
    PassParameters->Pass.RenderTargets[0] = FRenderTargetBinding(MixTexture, ERenderTargetLoadAction::ENoAction);
    PassParameters->InputSampler = BilinearClampSampler;
    PassParameters->GradientTexture = GWhiteTexture->TextureRHI;
    PassParameters->GradientSampler = BilinearClampSampler;
    PassParameters->BufferSize = BufferSize;
    PassParameters->PixelSize = FVector2f(1.0f, 1.0f) / BufferSize;
    PassParameters->InputViewportSize = FVector2f(BloomInputViewportSize);
    PassParameters->Tint = FVector4f(PostProcessAsset->Tint);
    PassParameters->Intensity = PostProcessAsset->Intensity;

    if (PostProcessAsset->Gradient != nullptr)
    {
        const FTextureRHIRef TextureRHI = PostProcessAsset->Gradient->Resource->TextureRHI;
        PassParameters->GradientTexture = TextureRHI;
    }
[...]
특별한 부분은 없다.
	[...]
	// Plug in buffers
        const int32 MixBloomPass = CVarLensFlareRenderBloom.GetValueOnRenderThread();

        PassParameters->MixPass = FIntVector(
            (Inputs.bCompositeWithBloom && MixBloomPass),
            (FlareTexture != nullptr),
            (GlareTexture != nullptr)
        );

        if( Inputs.bCompositeWithBloom && MixBloomPass )
        {
            PassParameters->BloomTexture = Inputs.Bloom.Texture;
        }
        else
        {
            PassParameters->BloomTexture = InputTexture;
        }

        if( FlareTexture != nullptr )
        {
            PassParameters->Pass.InputTexture = FlareTexture;
        }
        else
        {
            PassParameters->Pass.InputTexture = InputTexture;
        }

        if( GlareTexture != nullptr )
        {
            PassParameters->GlareTexture = GlareTexture;
        }
        else
        {
            PassParameters->GlareTexture = InputTexture;
        }
    [...]
이 부분은 셰이더 파라미터에 연결된 버퍼가 유효한지 확인하는데 중점을 둔다. nullptr은 허용되지 않으므로, 세이더에서 샘플링할 때 버퍼가 유효한지 여부를 알기 위해 IntVector를 boolean그룹으로 설정했다.
이 부분을 모두 if/else를 제거해 최적화가 가능하지만 cvar로 일부 효과를 토글하는 기능을 사용할 수 없다. 원하는 대로 적절히 조정하자.
마지막 코드
[...]
// Render
        DrawShaderPass(
            GraphBuilder,
            PassName,
            PassParameters,
            VertexShader,
            PixelShader,
            ClearBlendState,
            MixViewport
        );

        OutputTexture = MixTexture;
        OutputRect = MixViewport;
    }

    ////////////////////////////////////////////////////////////////////////
    // Final Output
    ////////////////////////////////////////////////////////////////////////
    Outputs.Texture = OutputTexture;
    Outputs.Rect    = OutputRect;

} // end of RenderLensFlare()
마지막 렌더링을 끝내고, Output struct에 할당해 준다. 이제 결과물을 확인해 본다.